


Stepper motor is a type of brushless DC motor whose rotation is divided into steps per revolution. Stepper motor takes a distinct number of steps to complete a one 360° rotation. Due to this feature stepper motors provide accurate controlling and used in 3D printers, CNC routers, and robotics. Stepper motor needs a motor driver and microcontroller to operate properly, here we will use A4988 stepper motor driver with Raspberry Pi to rotate the NEMA17 stepper motor through a webpage.
The webpage will be created using Flask Web Framework for Raspberry Pi stepper motor control. The webpage will have a slider and a submit button and it will send the slider values to the Raspberry Pi on pressing the submit button. In IoT based applications, Webservers are used to control or monitor any sensor values using web browsers, we previously created many webservers using Arduino, ESP8266, NodeMCU, ESP32, Raspberry Pi, etc.
Flask is a popular Python web framework developed by Armin Ronacher of Pocoo. It is a third-party Python library used for developing web applications. Flask is classified as micro-framework, and it is based on the Pocoo projects Werkzeug and Jinja2. Flask is very commonly used with Raspberry Pi, as RPi has Linux OS which can easily process Python script. Raspberry Pi is also popular for creating webserver and making IoT based projects because of its high processing power and inbuilt Wi-Fi capabilities.
Components Required
- Raspberry Pi 3
- NEMA17 Stepper Motor
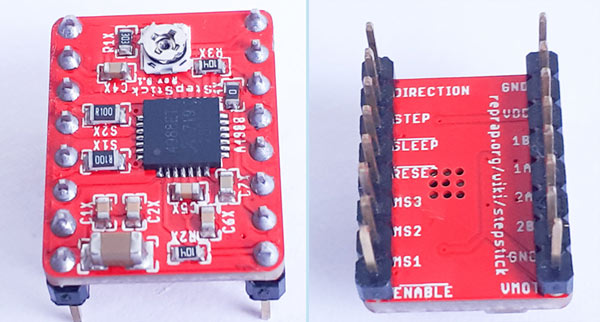
- A4988 Stepper Driver Module
- Jumper Wires
Circuit Diagram
Circuit diagram for controlling Nema 17 stepper motor with Raspberry Pi is given below:
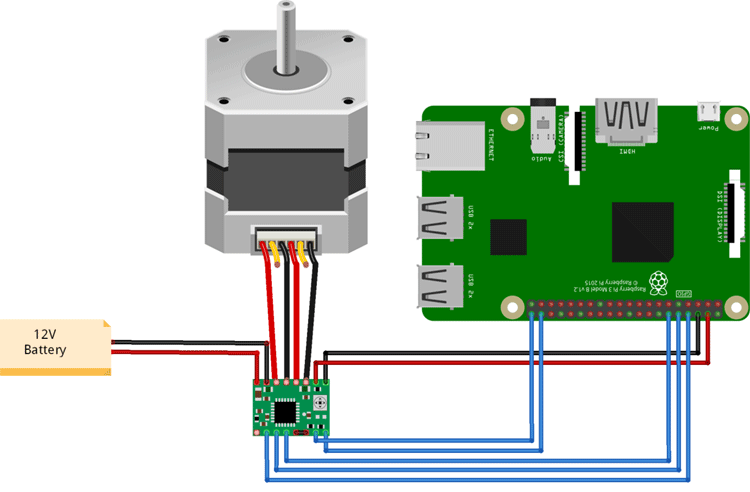
In this project, we used the A4988 stepper motor driver with Raspberry Pi. A4988 motor driver module has a built-in translator so it can control the stepper motor using Step and Direction pins. STEP pin controls the steps, and the DIRECTION pin controls the direction. Stepper motor is powered using a 12V power source, and the A4988 module is powered via Raspberry Pi. RST pin is connected to the SLP/SLEEP pin to keep the driver enabled.
Complete connections for Raspberry Pi Nema 17 are given in the below table.
|
S.NO. |
A4988 Pin |
Connection |
|
1 |
VMOT |
+ve Of Battery |
|
2 |
GND |
-ve of Battery |
|
3 |
VDD |
5V of Pi |
|
4 |
GND |
GND of Pi |
|
5 |
STP |
GPIO 21 |
|
6 |
DIR |
GPIO 20 |
|
7 |
1A, 1B, 2A, 2B |
Stepper Motor |
|
8 |
MS1, MS2, MS3 |
GPIO 14, 15 & 18 |

Installing Flask Module and Libraries
Here we will install the Flask modules and libraries using the following commands:
First, update your Raspberry Pi by using the following commands
sudo apt-get update
sudo apt-get upgrade
Now, install pip and Rpi.gpio libraries using the following commands:
sudo apt-get install python-pip
sudo pip install RPI.GPIO
Now use the following command to install Flask:
sudo pip install flask
Now install the Raspberry Pi Motor Library. It is a python library to control the various motors using Raspberry Pi. Use the following command to install the library.
sudo pip install rpimotorlib
Python Program Explanation
Complete python code for this Nema 17 stepper motor with Raspberry Pi project is given at the end of the document.
Start the code by importing the required library files. Import the GPIO, Flask, sleep, and RpiMotorLib from the respective library files. GPIO function enables us to program GPIO pins of PI. Sleep function is used to provide delay and Flask is used to create a Web application.
from flask import Flask, render_template_string, request
import RPi.GPIO as GPIO
from time import sleep
from RpiMotorLib import RpiMotorLib
Now define the Raspberry Pi GPIO pins where you connected the STEP, Direction & Microstep pins of the A4988 module.
GPIO_pins = (14, 15, 18)
direction = 20
step = 21
Get the slider values from the Web page and print them as integer values.
slider = request.form["slider"]
print(int(slider))
Now compare the slider values and rotate the motor in a clockwise direction if the slider value is greater than 10.
motor_go is the main method that moves the motor. It takes six inputs that are (clockwise, step-type, steps, step delay, verbose, inits delay).
Where:
Clockwise is used to control the direction of the motor, and you can change the direction motor by using True and False. False is for counter-clockwise direction, and True is for Clockwise direction.
Step type is used for defining the step resolutions. By using step type you can set the motor to one of the five-step resolutions.
Steps are used to define the no of steps for the motor.
Stepdelay is a delay between steps.
Verbose is a Boolean function used to write the pin actions. It is False by default.
Initdelay is the initial delay after initializing the GPIO pins but before the motor is moved
if (int(slider)>10):
       mymotortest.motor_go(True, "Full" , 600,int(slider)*.0004, False, .05)
       print("Rotating Clockwise")
Repeat the same procedure for the slider values less than 10.
if (int(slider)<10):
     mymotortest.motor_go(False, "Full" , 600,int(slider)*.001, False, .05)
     print("Rotating Anti-Clockwise")
Running the Raspberry Pi Web Server for controlling Nema17
Once your code is ready, and the Nema 17 stepper motor is connected as per the circuit diagram, turn ON the PI to write the program.
Create the thestepper.py file using the following command:
sudo nano stepper.py
Now paste the given at the end and run the python code using the following command:
python stepper.py
Now navigate to your Raspberry pi Web browser and type https://127.0.0.1:5000 to open the web page, as shown below.

Finally, move the slider and press the submit button to rotate the Stepper motor. If you move the slider in the left direction, then the motor will move in the Counter-Clockwise direction, and if you move the slider in the right direction then the motor will move in the clockwise direction. The speed of the motor depends on the slider values. If the slider value is high then motor speed will be slow and vice-versa.
This is how Nema17 stepper motor can be controlled using Python language. And by enabling the port forwarding in your router, you can control the stepper motor from anywhere in the world by typing the static IP provided by your ISP (Internet Service Provider).
Complete Raspberry Pi 3 stepper motor code and working video are given below.
from flask import Flask, render_template_string, request
from time import sleep
import RPi.GPIO as GPIO
from RpiMotorLib import RpiMotorLib
#define GPIO pins
GPIO_pins = (14, 15, 18) # Microstep Resolution MS1-MS3 -> GPIO Pin
direction= 20 # Direction -> GPIO Pin
step = 21 # Step -> GPIO Pin
# Declare an named instance of class pass GPIO pins numbers
mymotortest = RpiMotorLib.A4988Nema(direction, step, GPIO_pins, "A4988")
app = Flask(__name__)
#HTML Code
TPL = '''
<html>
<img src="https://iotdesignpro.com/sites/default/files/Iot%20Design%20Pro%20Logo_0.png" alt="">
<head><title>Web Page Controlled Stepper</title></head>
<body>
<h2> Web Page to Control Stepper</h2>
<form method="POST" action="test">
<h5> Use the slider to rotate Stepper Clockwise & Counter-Clockwise </h5>
<p>Slider <input type="range" min="1" max="20" name="slider" /> </p>
<input type="submit" value="submit" />
</form>
</body>
</html>
'''
@app.route("/")
def home():
return render_template_string(TPL)
@app.route("/test", methods=["POST"])
def test():
# Get slider Values
slider = request.form["slider"]
print(int(slider))
if (int(slider)>10):
mymotortest.motor_go(True, "Full" , 600,int(slider)*.0004, False, .05)
print("Rotating Clockwise")
if (int(slider)<10):
mymotortest.motor_go(False, "Full" , 600,int(slider)*.001, False, .05)
print("Rotating Anti-Clockwise")
return render_template_string(TPL)
# Run the app on the local development server
if __name__ == "__main__":
app.run()


