


Node-RED is a visual tool for non-programmers to work with the Internet of Things, it can be used to build application fasters and reduce the “go to market” time for IoT products. Node-RED can be used to easily interface hardware devices, APIs, and other online services together in new and interesting ways. Node-RED is an open-source IoT tool and has been implemented by the IBM Emerging Technology organization. It is written in JavaScript and works on the NodeJS platform.
Node-RED operates on a module-based approach where predefined modules are connected graphically to perform the sequence of operations on Node-RED or in other words, it directly accesses data from microcontroller boards like Arduino, Raspberry Pi using the predefined port no. or PIN. In this tutorial, we are going to send DHT11 sensor readings to the Node-RED dashboard using Arduino. Similarly, we have also connected Arduino with ThingSpeak to design a weather station.
For this tutorial, we will focus only on Arduino and Node-RED. Throughout this tutorial, we will cover how to install and set-up Node-RED on windows. Then we will also design a dashboard on Node-RED and use different input, output, and functions nodes to create a flow.
Components Required
Hardware components
- Arduino Uno
- DHT11 Sensor
- Jumper Wires
Software apps and online services
- Arduino IDE
- Node.js
- Node-RED
Circuit Diagram
The circuit diagram to interface the DHT11 sensor with Arduino is shown below, the schematic was drawn using Fritzing software.
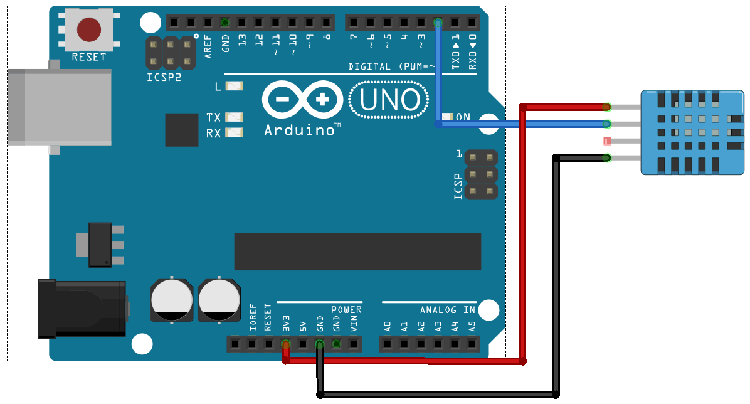
The DHT11 is a popular 3-pin sensor that can measure temperature and humidity. The sensor works with a one-wire protocol and is easy to use with development boards like Arduino. The Vcc pin of DHT11 is connected with Arduino’s 3.3v pin, and the GND pin is connected with Arduino’s GND pin. While the data pin is connected with the 2nd pin of Arduino. Once the connections are done, my hardware looked like this.

As you can see I have used simple female to male connecting wires to make the connections. The complete set-up is powered by the USB port connected to my computer. We previously connected DHT11 with Arduino to build IoT weather Station.
Code Explanation
The complete program for Arduino Node-RED can be found at the end of this tutorial. Programming Arduino UNO for this project doesn’t require much effort as it only uses one library for the DHT sensor. The Arduino board has to measure the temperature and humidity value from the DHT11 sensor and send it out serially using a COM port. This serial information will then be processed by the Node-RED.
So start the programming by initializing the required libraries, Arduino pins, and variables.
#include <DHT.h>
#define DHTPIN 2 // what pin we're connected to
#define DHTTYPE DHT11 // DHT 11  (AM2302)
DHT dht(DHTPIN, DHTTYPE);
//Variables
int chk;
float hum; //Stores humidity value
float temp; //Stores temp
The string function is used to convert the float variables into strings. Here the variable temperature and humidity are converted into a string.
String hum1;
String temp1;
In void loop(), dht11 sensor calculates the temperature and humidity values and store them into temp and hum variable respectively. Serial print is used to print the temperature and humidity values on the serial monitor.
void loop()
{
    //Read data and store it to variables hum and temp
    hum = dht.readHumidity();
    temp= dht.readTemperature();
    hum1 = String(hum);
    temp1 = String(temp);
    //Print temp and humidity values to serial monitor
   // Serial.print("Humidity: ");
    Serial.print(hum1);
    Serial.print(",");
    Serial.print(temp1);
   // Serial.println(" Celsius");

    delay(2000); //Delay 2 sec.
}
Connect the Arduino with the laptop and choose the board and port correctly and then click the Upload button. After uploading the code, open the serial monitor. Make the baud rate of the serial monitor 9600.
Setting up Node-RED
1. Install Node.js
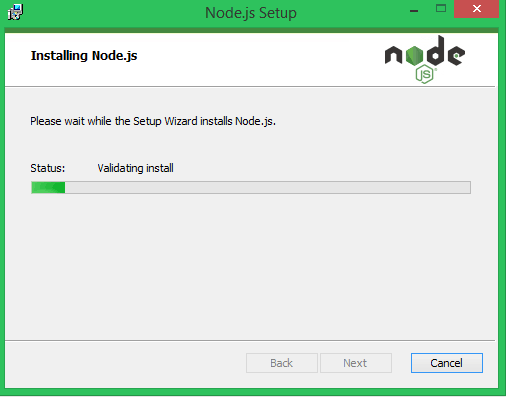
Download the latest version of Node.js from the official Node.js home page. At the time of writing this tutorial, the available version was 10.16.0. After downloading, run the downloaded MSI file and install Node.js in the default path.
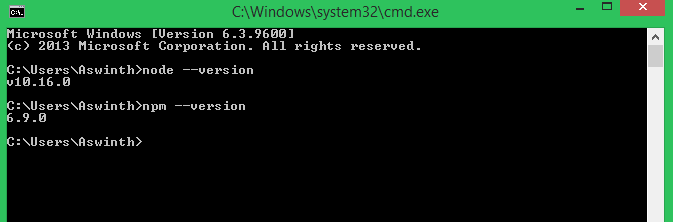
Once installed, open a command prompt and run the following command to ensure Node.js and npm are installed correctly.
node --version
npm --version
You should receive back output with the version number of our package. Mine looked something like this.
2. Install Node-RED
To install Node-RED on your system, run the following command on Command Prompt:
npm install -g --unsafe-perm node-red
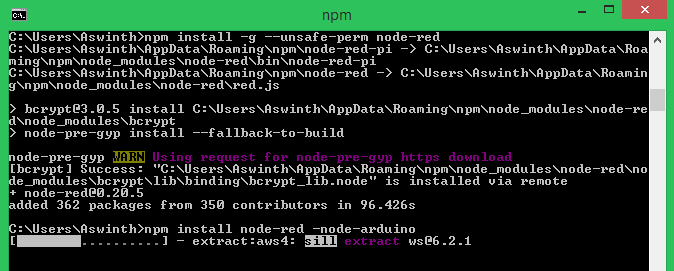
Node-RED doesn’t have preinstalled nodes for Arduino, Serial Port, and Dashboard. So use the following commands to install these nodes:
- To install the Arduino nodes
npm install node-red -node-arduino
- To install the serial port node
npm install node-red -node-serialport
- To install the Dashboard nodes
npm install node-red -dashboard
3. Run Node-RED
Once installed, Run the node-red using the following command in the command prompt:
node-red
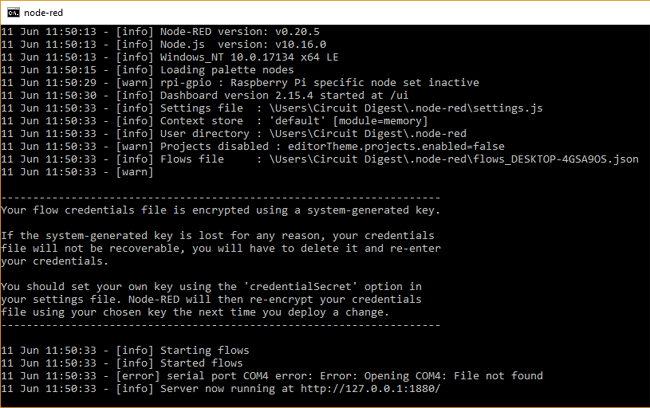
Copy the local-server link to your browser: http://localhost:1880 to access Node-RED. You should see a window like the one below showing node-red launch on the desktop.
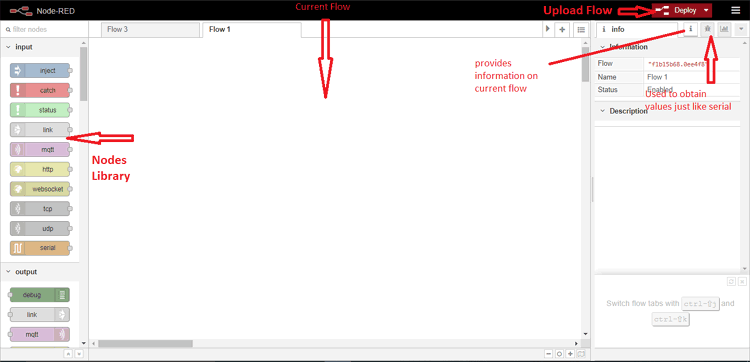
- Node Library is the list of nodes that are representative of hardware, protocols, and software features associated with devices
- Current Flow or flow is where the nodes are joined together to create a program
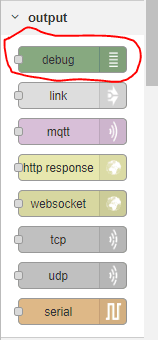
- Debug console works just like the Arduino Serial monitor and can provide the values
- The deploy button is used to upload the flow to the target hardware
- The info console provides information on highlighted/selected objects
Creating a Flow in Node-RED
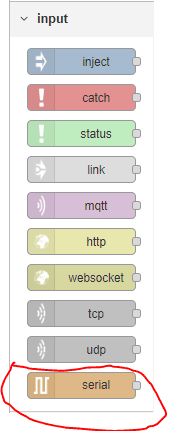
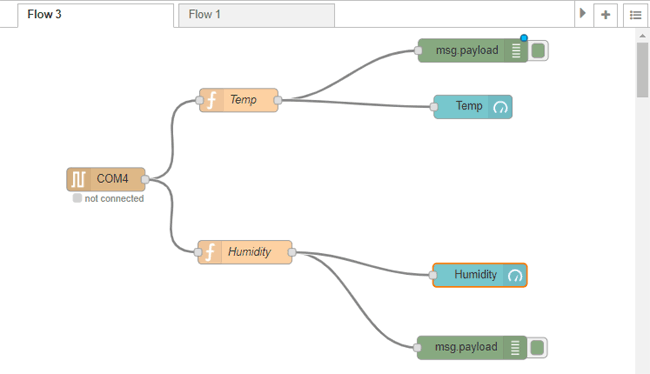
To Begin, drag the input Serial node into the flow section
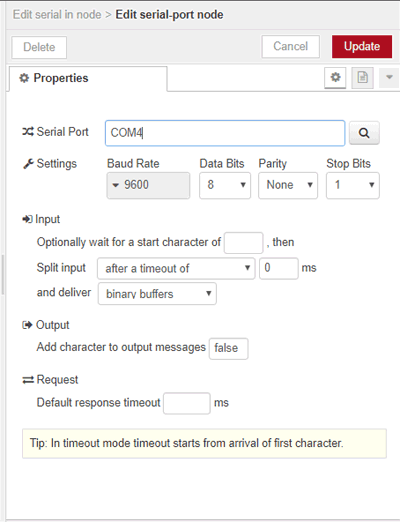
Now to edit, double click on the node, a pop window will open. In this window, enter the serial port at which Arduino is connected and select 9600 in the baud rate section.
After this, scroll down the node palette and drag the two Function node into the flow section, one for temperature and the other for humidity.
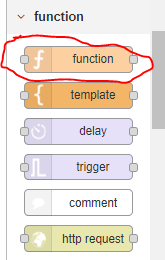
Double click on the first function to enter its name and program.
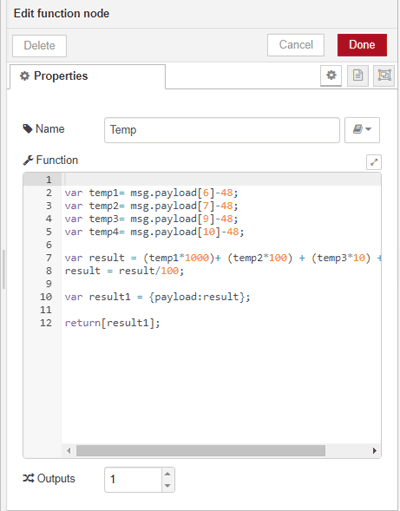
Java code for this function is given below:
var temp1= msg.payload[6]-48;
var temp2= msg.payload[7]-48;
var temp3= msg.payload[9]-48;
var temp4= msg.payload[10]-48;
var result = (temp1*1000)+ (temp2*100) + (temp3*10) + temp4;
result = result/100;
var result1 = {payload:result};
return[result1];
Node-RED receives Humidity and Temperature values in ASCII code format from the serial monitor. To display these values on Node-RED Dashboard, we need to convert ASCII code into real values. So to do this above java program is used. In this program, every ASCII code is subtracted by 48 except the decimal point and comma.
After the Temp function, now double click on the second function:
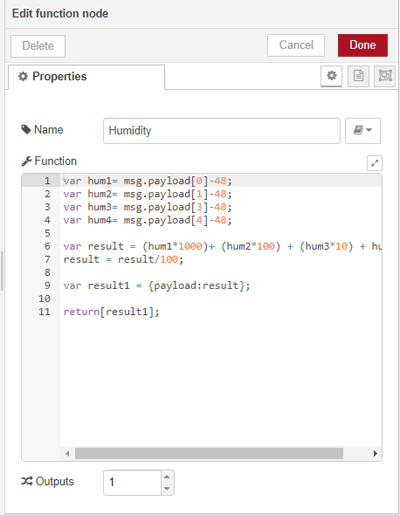
Java code for this function is as follows:
var hum1= msg.payload[0]-48;
var hum2= msg.payload[1]-48;
var hum3= msg.payload[3]-48;
var hum4= msg.payload[4]-48;
var result = (hum1*1000)+ (hum2*100) + (hum3*10) + hum4;
result = result/100;
var result1 = {payload:result};
return[result1];
As explained above, this program is used to change the Humidity values from ASCII code format to real values. After completing the temperature and humidity function, scroll down and drag two Debug nodes to the flow section.
To design the Dashboard, scroll down the node palette to the Dashboard and drag two Gauge to the flow section for Temperature and humidity.

The final flow will look like this
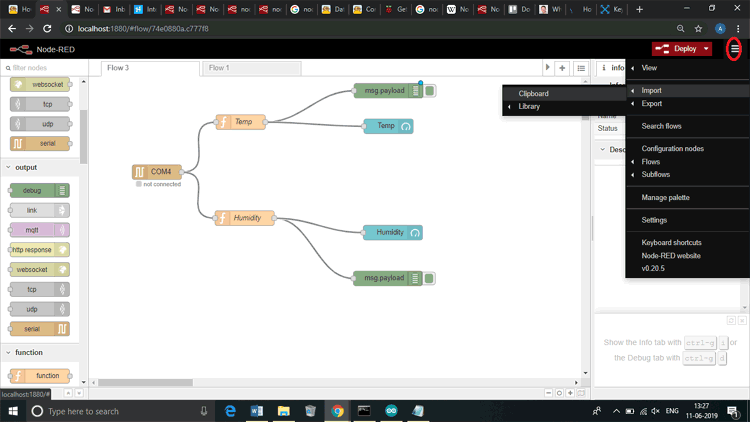
You can directly create this flow on your Node-RED server by importing the following code to your Node-RED server.
To do this, click on the menu button, then Import -> Clipboard. In the clipboard window, paste the below-given code.
Node-RED Code
[{"id":"74e0880a.c777f8","type":"tab","label":"Flow 3","disabled":false,"info":""},{"id":"e26c53af.cca2b","type":"serial in","z":"74e0880a.c777f8","name":"","serial":"58430f06.f23e4","x":137.5173568725586,"y":193.7500286102295,"wires":[["e45d22bf.57606","e06252b0.156d2"]]},{"id":"e45d22bf.57606","type":"function","z":"74e0880a.c777f8","name":"Temp","func":"\nvar temp1= msg.payload[6]-48;\nvar temp2= msg.payload[7]-48;\nvar temp3= msg.payload[9]-48;\nvar temp4= msg.payload[10]-48;\n\nvar result = (temp1*1000)+ (temp2*100) + (temp3*10) + temp4; \nresult = result/100;\n\nvar result1 = {payload:result};\n\nreturn[result1];","outputs":1,"noerr":0,"x":307.07645416259766,"y":92.56599521636963,"wires":[["d914ac8d.cd404","9f2a37c9.0d8f88"]]},{"id":"d914ac8d.cd404","type":"debug","z":"74e0880a.c777f8","name":"","active":true,"tosidebar":true,"console":false,"tostatus":false, "complete":"false","x":581.3498992919922,"y":37.79081916809082,"wires":[]},{"id":"e06252b0.156d2","type":"function","z":"74e0880a.c777f8","name":"Humidity","func":"var hum1= msg.payload[0]-48;\nvar hum2= msg.payload[1]-48;\nvar hum3= msg.payload[3]-48;\nvar hum4= msg.payload[4]-48;\n\nvar result = (hum1*1000)+ (hum2*100) + (hum3*10) + hum4; \nresult = result/100;\n\nvar result1 = {payload:result};\n\nreturn[result1];","outputs":1,"noerr":0,"x":315.0911521911621,"y":286.6883945465088,"wires":[["f35a3030.d7841","f7b0f890.f22e18"]]},{"id":"f35a3030.d7841","type":"debug","z":"74e0880a.c777f8","name":"","active":true,"tosidebar":true,"console":false,"tostatus":false, "complete":"false","x":582.6041069030762,"y":361.12417221069336,"wires":[]},{"id":"9f2a37c9.0d8f88","type":"ui_gauge","z":"74e0880a.c777f8","name":"Temp","group":"d5da3e9b.46abf","order":0,"width":0, "height":0,"gtype":"gage","title":"temp","label":"units","format":"{{value}} °C","min":0,"max":"100","colors":["#00b500","#e6e600","#ca3838"],"seg1":"","seg2":"","x":570.0998001098633,"y":99.71789360046387,"wires":[]},{"id":"f7b0f890.f22e18","type":"ui_gauge","z":"74e0880a.c777f8","name":"Humidity","group":"d5da3e9b.46abf","order":1,"width":0, "height":0,"gtype":"gage","title":"Humidity","label":"units","format":"{{value}}%","min":0,"max":"100","colors":["#00b500","#e6e600","#ca3838"],"seg1":"","seg2":"","x":583.8411865234375,"y":288.4635429382324,"wires":[]},{"id":"58430f06.f23e4","type":"serial-port","z":"","serialport":"COM4","serialbaud":"9600","databits":"8","parity":"none","stopbits":"1","waitfor":"","newline":"0","bin":"bin", "out":"time","addchar":"false","responsetimeout":""},{"id":"d5da3e9b.46abf","type":"ui_group","z":"","name":"DHT11","tab":"784aac14.5c2404","order":2,"disp":true,"width":"6", "collapse":false},{"id":"784aac14.5c2404","type":"ui_tab","z":"","name":"Station","icon":"dashboard","order":1,"disabled":false,"hidden":false}]
Now flow is ready to deploy. We can deploy a flow on Node-RED using the deploy button.
To access the Node-RED Dashboard, copy the link: http://localhost:1880/ui in your browser. Node-RED Dashboard will look like this:
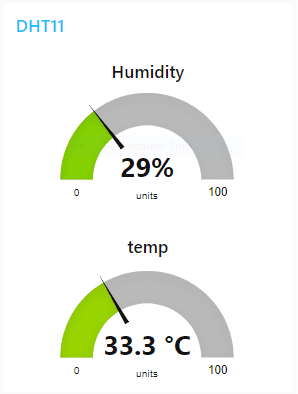
By forwarding the port in your router, this webpage can be accessed from anywhere over the internet. So this is how Node-RED can be used to do graphical programming and used to build IoT-based applications.
Also, check the demonstration video given below.
#include <DHT.h>
//Constants
#define DHTPIN 2 // what pin we're connected to
#define DHTTYPE DHT11 // DHT 11 (AM2302)
// Initialize DHT sensor for normal 16mhz Arduino
DHT dht(DHTPIN, DHTTYPE);
//Variables
int chk;
float hum; //Stores humidity value
float temp; //Stores temperature value
void setup()
{
Serial.begin(9600);
dht.begin();
}
String hum1;
String temp1;
void loop()
{
//Read data and store it to variables hum and temp
hum = dht.readHumidity();
temp= dht.readTemperature();
hum1 = String(hum);
temp1 = String(temp);
//Print temp and humidity values to serial monitor
// Serial.print("Humidity: ");
Serial.print(hum1);
Serial.print(",");
Serial.print(temp1);
// Serial.println(" Celsius");
delay(2000); //Delay 2 sec.
}


