


IoT based food ordering systems are replacing the traditional food ordering system in restaurants. Instead of using paper-based menu cards, Restaurants are now installing touch screen displays on tables, so the customers can directly select the food items from the screen and order the food easily.
Here in this project, we are building an IoT based smart restaurant project using Arduino. Here a TFT touch display is used to make the order and the HC-05 Bluetooth module is used to send the data to Arduino. Blynk app is used as an IoT platform where all the data is uploaded and can be monitored from anywhere in the world.
Components Required
- Arduino Uno
- 2.4” TFT LCD Display Shield
- HC-05 Bluetooth Module
Restaurant Menu Ordering System Circuit Diagram
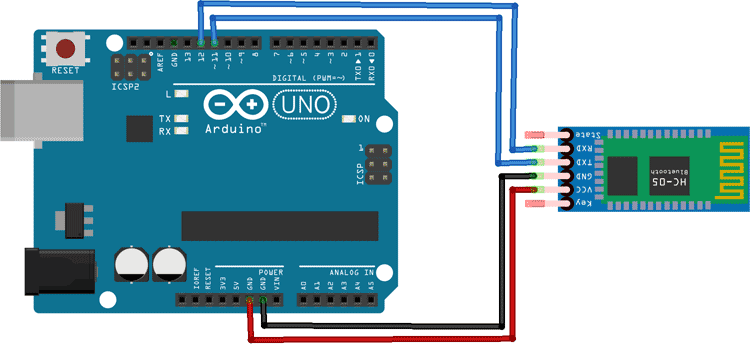
Circuit Diagram for this smart ordering system is very simple as we are only connecting the TFT display and Bluetooth module with Arduino. Vcc and GND pin of Bluetooth module is connected to 5V and GND pin of Arduino while TX and RX pins are connected to digital pin 11 & 12 of Arduino.
The 2.4” TFT LCD screen is an Arduino Shield that can be directly mounted on Arduino Uno, as shown in the below image. TFT display has 28 pins that perfectly fit into Arduino Uno, so I had to solder the Bluetooth module backside of Arduino.
Configuring Blynk App for Smart Restaurant Project
Download the Blynk app from the Google Play Store and create a new account or Login into your existing account. Learn more about using Blynk by going through various Blynk based IoT projects.
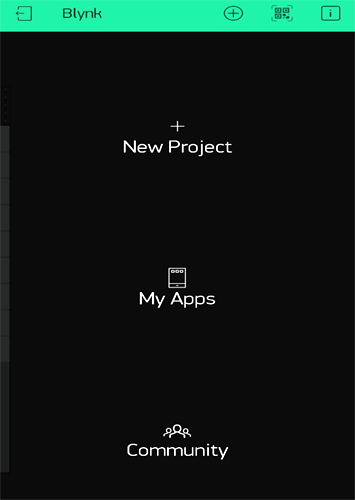
After login, first, click on the ‘New Project’ to start a new project.
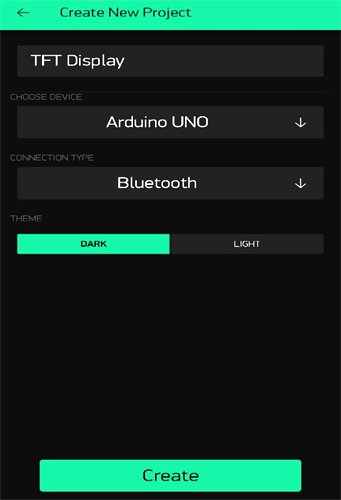
Then give a name for your project. Select ‘Arduino Uno’ in the CHOOSE DEVICE option and ‘Bluetooth’ in CONNECTION TYPE. Then click on ‘Create.’
After this, Blynk will send an Authorization to the registered Email id. Note down the Auth Token Code. It will be used in the Program.
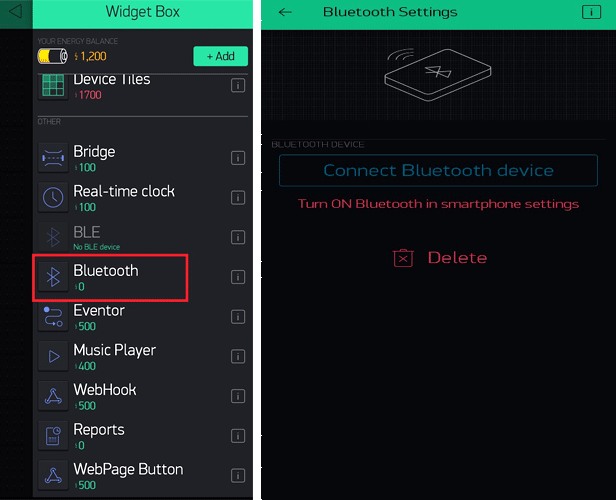
Now go to the Widget box and select the ‘Bluetooth’ widget. Click on Bluetooth and then click on ‘Connect Bluetooth Device.’ Before that, turn on the Bluetooth of your phone and select ‘HC-05’, if it asks for a PIN, then enter 1234.
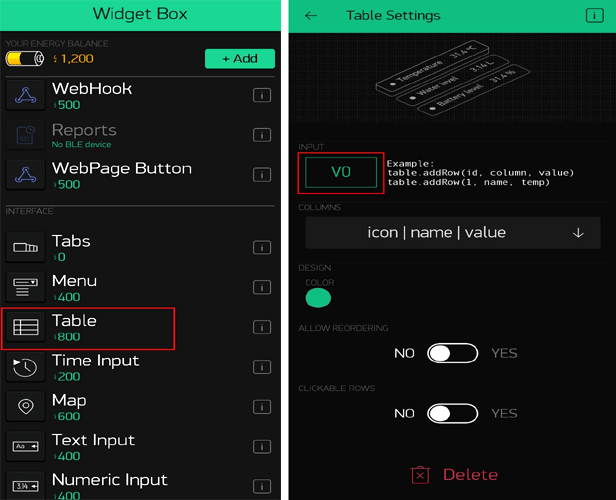
Then again, go to the Widget box and select the ‘Table’ widget. Click on Table widget and select virtual pin ‘V0’ as INPUT.
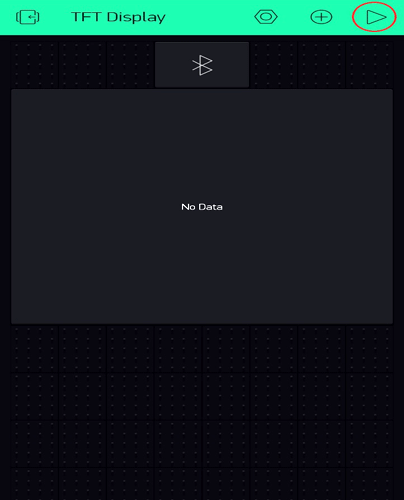
Now click on the ‘Play’ button to run your project.
Code Explanation
Complete code for this Smart Restaurant Project using Arduino is given at the end of the page. There are three sections in this code. One is for creating UI of a restaurant menu, second is detecting the touch, and third is sending the data to the Blynk app according to the buttons touched by the user. Here we are explaining all the important functions.
Start your code by including all the required libraries. Here we are using SPFD5408 Library which is a modified version of the original Adafruit Library. Apart from the SPFD library, Blynk and Software Serial libraries are also used. So before going further, install all the three libraries in Arduino IDE.
#include <SPFD5408_Adafruit_GFX.h>    // Core graphics library
#include <SPFD5408_Adafruit_TFTLCD.h> // Hardware-specific library
#include <SPFD5408_TouchScreen.h>
#include <BlynkSimpleSerialBLE.h>
#include <SoftwareSerial.h>
After that, define the calibration values for the X and Y-axis. Here the default values are used, which are given in the library. You can use your calibration values if you think that your screen touch is not working properly.
#define TS_MINX 125
#define TS_MINY 85
#define TS_MAXX 965
#define TS_MAXY 905
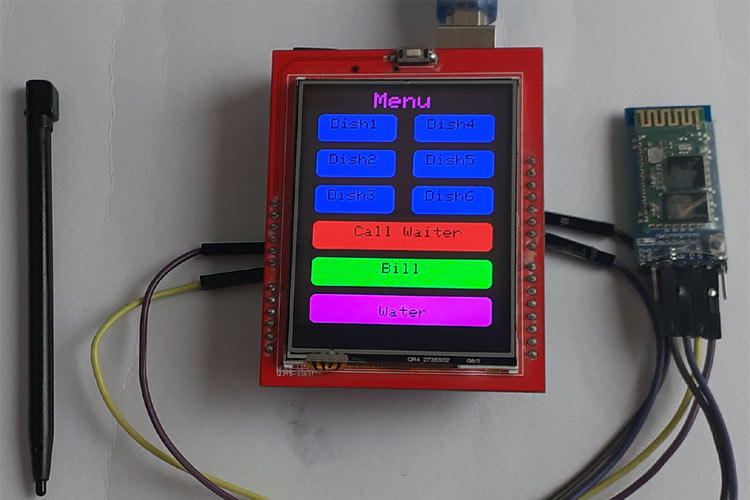
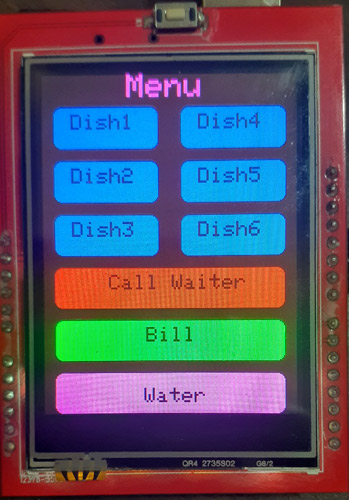
After including the libraries and defining some important parameters, it’s time to create a UI of a restaurant menu. Here we created a simple UI that has a total of nine buttons. Out of nine, six buttons are for ordering different dishes and rest three are for calling the waiter, asking for water, and get the bill.
Here fillRoundRect and drawRoundRect functions are used to draw the buttons. You can draw Lines, Rectangle, Circles, Chars, Strings, and lot more using the available functions. Syntax and explanation for tft.drawRoundRect function are given below:
tft.drawRoundRect(int16_t x0, int16_t y0, int16_t w, int16_t h, int16_t radius, uint16_t color)
Where:
x0= X co-ordinate of the starting point of rectangular
y0= Y coordinate of the starting point of rectangular
w = Width of the rectangular
h = Height of the Rectangular
radius= Radius of the round corner
color = Colour of the Rect.
tft.fillRoundRect(10, 30, 100, 40, 8, GOLD);
 tft.drawRoundRect(10, 30, 100, 40, 8, WHITE);  //Dish1
  tft.fillRoundRect(10, 80, 100, 40, 8, GOLD);
  tft.drawRoundRect(10, 80, 100, 40, 8, WHITE);  //Dish2
  tft.fillRoundRect(10, 130, 100, 40, 8, GOLD);   //Dish3
  tft.drawRoundRect(10, 130, 100, 40, 8, WHITE);
  tft.fillRoundRect(10, 180, 220, 40, 8, CYAN);
  tft.drawRoundRect(10, 180, 220, 40, 8, WHITE); //Call Waiter
  tft.fillRoundRect(130, 30, 100, 40, 8, GOLD);
  tft.drawRoundRect(130, 30, 100, 40, 8, WHITE);  //Dish4
  tft.fillRoundRect(130, 80, 100, 40, 8, GOLD);
  tft.drawRoundRect(130, 80, 100, 40, 8, WHITE); //Dish5
  tft.fillRoundRect(130, 130, 100, 40, 8, GOLD);
  tft.drawRoundRect(130, 130, 100, 40, 8, WHITE); //Dish6
  tft.fillRoundRect(10, 230, 220, 40, 8, MAGENTA);
  tft.drawRoundRect(10, 230, 220, 40, 8, WHITE); //Bill
  tft.fillRoundRect(10, 280, 220, 40, 8, GREEN);
  tft.drawRoundRect(10, 280, 220, 40, 8, WHITE); //Water
After creating the buttons, give names to them using tft.setCursor and tft.print functions.
tft.setCursor(15, 37);
  tft.print(" Dish1");
  tft.setCursor(15, 87);
  tft.print(" Dish2");
  tft.setCursor(15, 137);
  tft.print(" Dish3");
  tft.setCursor(50, 187);
  tft.print(" Call Waiter");
Finally, the restaurant Menu UI will look like this:
Now in the second section of the code, we will detect the button touch. For that, define the exact X and Y coordinates for every button and read Raw ADC values using the ts.getPoint function and then convert the Raw ADC values to Pixel Co-ordinates using the map function. You can use the Serial Monitor to get the X and Y coordinates for each button and can also predict the position of every button using the screen layout.
TSPoint p = ts.getPoint();
  digitalWrite(13, LOW);
  // if sharing pins, you'll need to fix the directions of the touchscreen pins
  //pinMode(XP, OUTPUT);
  pinMode(XM, OUTPUT);
  pinMode(YP, OUTPUT);
  //pinMode(YM, OUTPUT);
  if (p.z > ts.pressureThreshhold)
    {
      p.x = map(p.x, TS_MAXX, TS_MINX, 0, 320);
      p.y = map(p.y, TS_MAXY, TS_MINY, 0, 240);
      Serial.print("X:");  // I used this to get the accurate touch points for X and Y axis
      Serial.print(p.x);
      Serial.print("\n");
      Serial.print("Y:");
      Serial.print(p.y);
After getting the X and Y coordinates for each button, use these values to predict where the user has touched the screen.
if (p.x > 30 && p.x < 70 && p.y > 130 && p.y < 230  && p.z > MINPRESSURE && p.z < MAXPRESSURE)
      {
        Serial.println("Dish1");
        msg = "Dish1 Ordered";
        transmit();
        tft.fillRoundRect(10, 30, 100, 40, 8, WHITE);
        delay(70);
        tft.fillRoundRect(10, 30, 100, 40, 8, GOLD);
        tft.drawRoundRect(10, 30, 100, 40, 8, WHITE);
        tft.setCursor(15, 37);
        tft.println(" Dish1");
        delay(70);
        }
      if (p.x > 80 && p.x < 120 && p.y > 130 && p.y < 230)
      {
        Serial.println("Dish2");
        msg = "Dish2 Ordered";
        transmit();
        tft.fillRoundRect(10, 80, 100, 40, 8, WHITE);
        delay(70);
        tft.fillRoundRect(10, 80, 100, 40, 8, GOLD);
        tft.drawRoundRect(10, 80, 100, 40, 8, WHITE);
        tft.setCursor(15, 87);
        tft.println(" Dish2");
        delay(70);
    }
Now in the final section of the code, send the data to the Blynk app using the HC-05 Bluetooth module.
void transmit()
{
  SerialBLE.begin(9600);
  Blynk.begin(SerialBLE, auth);
  Blynk.virtualWrite(V0, "add", rowIndex, msg, "T1");
  rowIndex++;
  Blynk.run();
  }
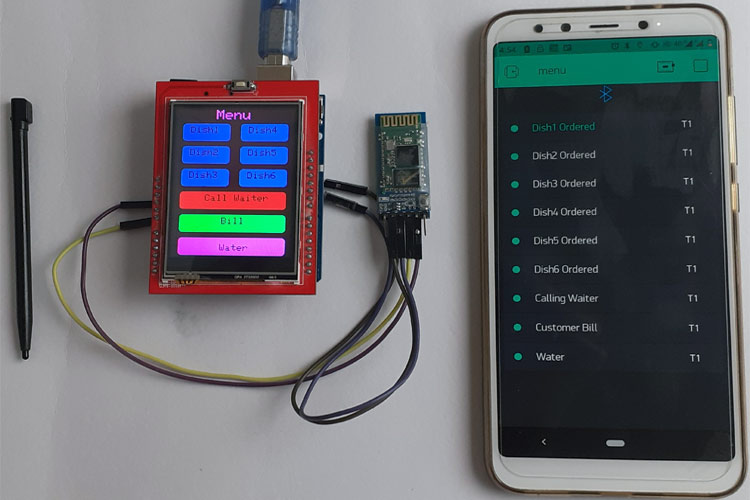
Testing the Smart Ordering System in Restaurant
After connecting the TFT display and Bluetooth module, upload the given code in Arduino Uno and open the Blynk app. Inside the Blynk app, open the project and connect the Blynk app with the Bluetooth module.
Now press any button on TFT display and check if the Blynk app is sending the message associated with that button. For example, if you press the ‘Bill’ button, then it should display ‘Customer Button’ in the table widget.
Complete working video and code are given below.
#include <SPFD5408_Adafruit_GFX.h> // Core graphics library
#include <SPFD5408_Adafruit_TFTLCD.h> // Hardware-specific library
#include <SPFD5408_TouchScreen.h>
#include <BlynkSimpleSerialBLE.h>
#include <SoftwareSerial.h>
SoftwareSerial SerialBLE(11,12); // RX, TX
char auth[] = "BaJMseLrTQENE0HEqjbKYHkfqwY-OoW9";
int rowIndex = 0;
String msg ;
#define YP A1 // must be an analog pin, use "An" notation!
#define XM A2 // must be an analog pin, use "An" notation!
#define YM 7 // can be a digital pin
#define XP 6 // can be a digital pin
#define TS_MINX 125
#define TS_MINY 85
#define TS_MAXX 965
#define TS_MAXY 905
TouchScreen ts = TouchScreen(XP, YP, XM, YM, 300);
#define LCD_CS A3
#define LCD_CD A2
#define LCD_WR A1
#define LCD_RD A0
// optional
#define LCD_RESET A4
#define REDBAR_MINX 80
#define GREENBAR_MINX 130
#define BLUEBAR_MINX 180
#define BAR_MINY 30
#define BAR_HEIGHT 250
#define BAR_WIDTH 30
Adafruit_TFTLCD tft(LCD_CS, LCD_CD, LCD_WR, LCD_RD, LCD_RESET);
#define BLACK 0x0000
int BLUE = tft.color565(50, 50, 255);
#define DARKBLUE 0x0010
#define VIOLET 0x8888
#define RED 0xF800
#define GREEN 0x07E0
#define CYAN 0x07FF
#define MAGENTA 0xF81F
#define YELLOW 0xFFE0
#define WHITE 0xFFFF
#define GREY tft.color565(64, 64, 64);
#define GOLD 0xFEA0
#define BROWN 0xA145
#define SILVER 0xC618
#define LIME 0x07E0
void drawHome()
{
tft.fillScreen(WHITE);
tft.drawRoundRect(0, 0, 319, 240, 8, WHITE); //Page border
tft.fillRoundRect(10, 30, 100, 40, 8, GOLD);
tft.drawRoundRect(10, 30, 100, 40, 8, WHITE); //Dish1
tft.fillRoundRect(10, 80, 100, 40, 8, GOLD);
tft.drawRoundRect(10, 80, 100, 40, 8, WHITE); //Dish2
tft.fillRoundRect(10, 130, 100, 40, 8, GOLD); //Dish3
tft.drawRoundRect(10, 130, 100, 40, 8, WHITE);
tft.fillRoundRect(10, 180, 220, 40, 8, CYAN);
tft.drawRoundRect(10, 180, 220, 40, 8, WHITE); //Call Waiter
tft.fillRoundRect(130, 30, 100, 40, 8, GOLD);
tft.drawRoundRect(130, 30, 100, 40, 8, WHITE); //Dish4
tft.fillRoundRect(130, 80, 100, 40, 8, GOLD);
tft.drawRoundRect(130, 80, 100, 40, 8, WHITE); //Dish5
tft.fillRoundRect(130, 130, 100, 40, 8, GOLD);
tft.drawRoundRect(130, 130, 100, 40, 8, WHITE); //Dish6
tft.fillRoundRect(10, 230, 220, 40, 8, MAGENTA);
tft.drawRoundRect(10, 230, 220, 40, 8, WHITE); //Bill
tft.fillRoundRect(10, 280, 220, 40, 8, GREEN);
tft.drawRoundRect(10, 280, 220, 40, 8, WHITE); //Bill
tft.setCursor(62, 0);
tft.setTextSize(3);
tft.setTextColor(LIME);
tft.print(" Menu");
tft.setTextSize(2);
tft.setTextColor(WHITE);
tft.setCursor(15, 37);
tft.print(" Dish1");
tft.setCursor(15, 87);
tft.print(" Dish2");
tft.setCursor(15, 137);
tft.print(" Dish3");
tft.setCursor(50, 187);
tft.print(" Call Waiter");
tft.setCursor(135, 37);
tft.print(" Dish4");
tft.setCursor(135, 87);
tft.print(" Dish5");
tft.setCursor(135, 137);
tft.print(" Dish6");
tft.setCursor(85, 237);
tft.print(" Bill");
tft.setCursor(95, 295);
tft.print("Water");
// delay(500);
}
int oldcolor, currentcolor, currentpcolour;
void setup(void) {
tft.reset();
tft.begin(tft.readID());
tft.setRotation(2);
Serial.begin(9600);
Serial.println();
Serial.print("reading id...");
delay(500);
//Serial.println(tft.readID(), HEX);
tft.fillScreen(BLACK);
tft.setTextSize(3);
tft.setTextColor(WHITE);
tft.setCursor(50, 140);
tft.print("Loading...");
for (int i; i < 250; i++)
{
tft.fillRect(BAR_MINY - 10, BLUEBAR_MINX, i, 10, RED);
delay(0.000000000000000000000000000000000000000000000000001);
}
tft.fillScreen(BLACK);
drawHome();
pinMode(13, OUTPUT);
Blynk.virtualWrite(V0, "clr");
}
#define MINPRESSURE 10
#define MAXPRESSURE 1000
void transmit()
{
SerialBLE.begin(9600);
Blynk.begin(SerialBLE, auth);
//Blynk.virtualWrite(V0, "clr");
Blynk.virtualWrite(V0, "add", rowIndex,msg, "T1");
rowIndex++;
Blynk.run();
}
void loop()
{
// Blynk.virtualWrite(V0, "clr");
digitalWrite(13, HIGH);
TSPoint p = ts.getPoint();
digitalWrite(13, LOW);
// if sharing pins, you'll need to fix the directions of the touchscreen pins
//pinMode(XP, OUTPUT);
pinMode(XM, OUTPUT);
pinMode(YP, OUTPUT);
//pinMode(YM, OUTPUT);
if (p.z > ts.pressureThreshhold)
{
p.x = map(p.x, TS_MAXX, TS_MINX, 0, 320);
p.y = map(p.y, TS_MAXY, TS_MINY, 0, 240);
//Serial.print("X:"); // I used this to get the accurate touch points for X and Y axis
//Serial.print(p.x);
//Serial.print("\n");
//Serial.print("Y:");
//Serial.print(p.y);
if (p.x > 30 && p.x < 70 && p.y > 130 && p.y < 230 && p.z > MINPRESSURE && p.z < MAXPRESSURE)
{
Serial.println("Dish1");
msg = "Dish1 Ordered";
transmit();
tft.fillRoundRect(10, 30, 100, 40, 8, WHITE);
delay(70);
tft.fillRoundRect(10, 30, 100, 40, 8, GOLD);
tft.drawRoundRect(10, 30, 100, 40, 8, WHITE);
tft.setCursor(15, 37);
tft.println(" Dish1");
delay(70);
}
if (p.x > 80 && p.x < 120 && p.y > 130 && p.y < 230)
{
Serial.println("Dish2");
msg = "Dish2 Ordered";
transmit();
tft.fillRoundRect(10, 80, 100, 40, 8, WHITE);
delay(70);
tft.fillRoundRect(10, 80, 100, 40, 8, GOLD);
tft.drawRoundRect(10, 80, 100, 40, 8, WHITE);
tft.setCursor(15, 87);
tft.println(" Dish2");
delay(70);
}
if (p.x > 130 && p.x < 170 && p.y > 130 && p.y < 230)
{
Serial.println("Dish3");
msg = "Dish3 Ordered";
transmit();
tft.fillRoundRect(10, 130, 100, 40, 8, WHITE); //rgb led
delay(70);
tft.fillRoundRect(10, 130, 100, 40, 8, GOLD); //rgb led
tft.drawRoundRect(10, 130, 100, 40, 8, WHITE); //rgb led
tft.setCursor(15, 137);
tft.print(" Dish3");
delay(70);
}
if (p.x > 180 && p.x < 220 && p.y > 10 && p.y < 230)
{
Serial.println("Call Waiter");
msg = "Calling Waiter";
transmit();
tft.fillRoundRect(10, 180, 220, 40, 8, WHITE);
delay(70);
tft.fillRoundRect(10, 180, 220, 40, 8, CYAN);
tft.drawRoundRect(10, 180, 220, 40, 8, WHITE);
tft.setCursor(50, 187);
tft.print(" Call Waiter");
delay(70);
}
if (p.x > 30 && p.x < 70 && p.y > 10 && p.y < 110)
{
Serial.println("Dish4");
msg = "Dish4 Ordered";
transmit();
tft.fillRoundRect(130, 30, 100, 40, 8, WHITE);
delay(70);
tft.fillRoundRect(130, 30, 100, 40, 8, GOLD);
tft.drawRoundRect(130, 30, 100, 40, 8, WHITE);
tft.setCursor(135, 37);
tft.print(" Dish4");
delay(70);
}
if (p.x > 80 && p.x < 120 && p.y > 10 && p.y < 110 )
{
Serial.println("Dish5");
msg = "Dish5 Ordered";
transmit();
tft.fillRoundRect(130, 80, 100, 40, 8, WHITE);
delay(70);
tft.fillRoundRect(130, 80, 100, 40, 8, GOLD);
tft.drawRoundRect(130, 80, 100, 40, 8, WHITE);
tft.setCursor(135, 87);
tft.print(" Dish5");
delay(70);
}
if (p.x > 130 && p.x < 170 && p.y > 10 && p.y < 110)
{
Serial.println("Dish6");
msg = "Dish6 Ordered";
transmit();
tft.fillRoundRect(130, 130, 100, 40, 8, WHITE);
delay(70);
tft.fillRoundRect(130, 130, 100, 40, 8, GOLD);
tft.drawRoundRect(130, 130, 100, 40, 8, WHITE);
tft.setCursor(135, 137);
tft.print(" Dish6");
delay(70);
}
if (p.x > 230 && p.x < 270 && p.y > 10 && p.y < 230)
{
Serial.println("Bill");
msg = "Customer Bill";
transmit();
tft.fillRoundRect(10, 230, 220, 40, 8, WHITE);
delay(70);
tft.fillRoundRect(10, 230, 220, 40, 8, MAGENTA);
tft.drawRoundRect(10, 230, 220, 40, 8, WHITE);
tft.setCursor(85, 237);
tft.print(" Bill");
delay(70);
}
if (p.x > 280 && p.x < 320 && p.y > 10 && p.y < 230)
{
Serial.println("Water");
msg = "Water";
transmit();
tft.fillRoundRect(10, 280, 220, 40, 8, WHITE);
delay(70);
tft.fillRoundRect(10, 280, 220, 40, 8, GREEN);
tft.drawRoundRect(10, 280, 220, 40, 8, WHITE);
tft.setCursor(95, 295);
tft.print("Water");
delay(70);
}
}
}


