


There are number of IoT platforms which can be used for sending or receiving data over the internet. Earlier, we have done monitoring of Temperature and Humidity data using ThingSpeak and ESP8266. Here, we are sending Temperature and Humidity data to Google’s Firebase cloud using NodeMCU ESP8266. So, for that we just need to setup a database on Firebase and interface it with ESP8266 NodeMCU.
Not only google firebase but there are number of IoT platforms like Adafruit IO, IFTTT, ThingSpeak which are available for showcasing your IOT project data over the internet. But Google’s Firebase is a bit fast than other IoT platforms. It works without any delay with real-time IoT projects.
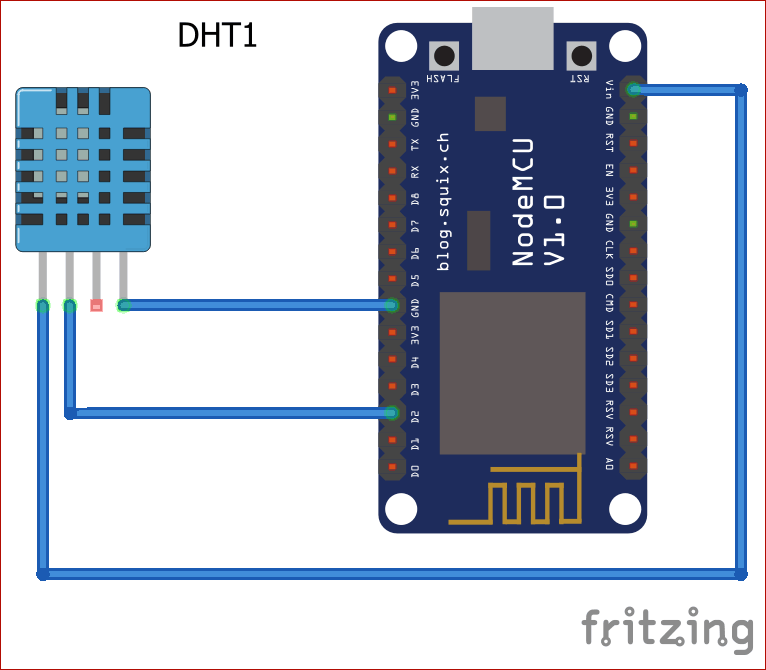
Components Required
- NodeMCU ESP8266 Module
- DHT11 Temperature and Humidity sensor
Circuit Diagram
Setting up Firebase Console for ESP8266
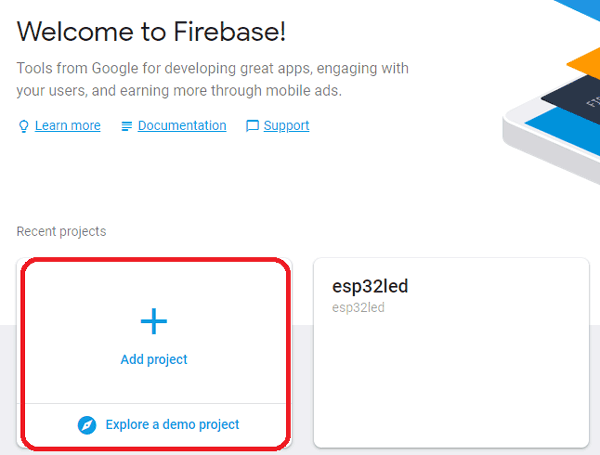
If you are using firebase for the first time then you have to create account for firebase or can directly signup using Google Account:
- Open your browser and go for https://firebase.google.com
- At the right top corner click on “Go to Console”.

- Click on “Add Project”.
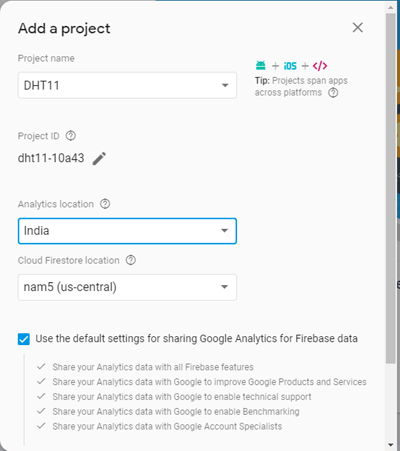
- Input your project name as you want and click on create project.
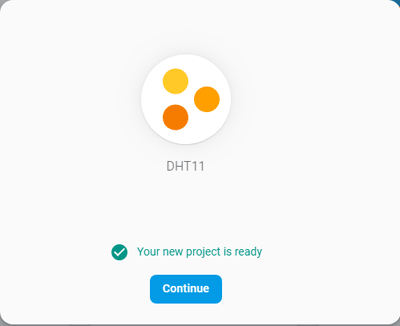
5. Now your project is created and click on “Continue”
6. Now you will need host name and authorization key/secret key for this project while programming your ESP32; so now we will see how these parameters can be taken from this.
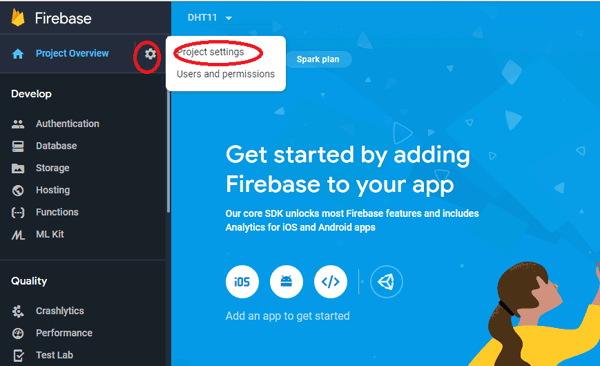
7. Go to setting icon and click on “Project Setting”.
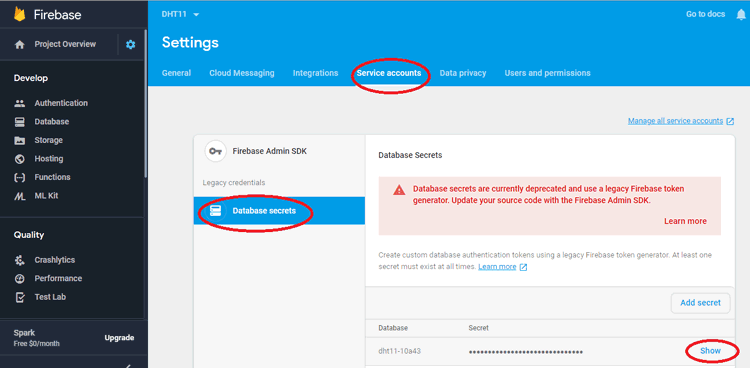
8. Now click on Service accounts and then Database secrets.
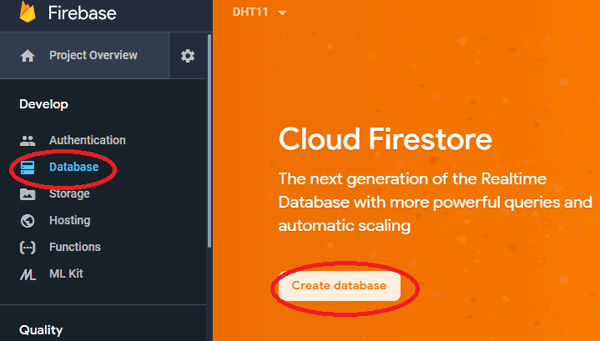
9. Now on left control bar click on ‘Database’. And then click on ‘Create database’.
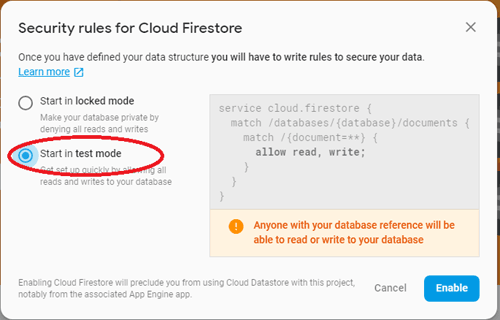
10. Now choose “Start in test mode” and click on Enable.
11. Now your database is created and you will have to come here again to control your LED, for now just copy the given URL without slash and http in notepad this is your firebase host which you will be required later.
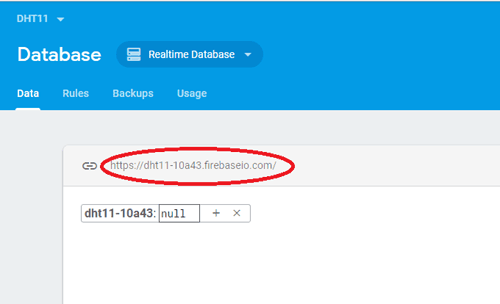
Just copy “dht11-10a43.firebaseio.com” without any slash and https. This will be your “FIREBASE_HOST”.
Programming ESP8266 for Google Firebase
Complete code for this project is given at the end of the tutorial.
First include all required libraries for this project
#include <ESP8266WiFi.h
#include <FirebaseArduino.h
#include <DHT.h>
The below two parameters will enable communication between Firebase and NodeCU.
#define FIREBASE_HOST "your-project.firebaseio.com"
 #define FIREBASE_AUTH "FIREBASE_AUTH"
Define DHT pin connected to NodeMCU.
#define DHTPIN D2
For taking humidity and temperature readings from DHT sensor, we are using the below code.
dht.begin();
float h = dht.readHumidity();
float t = dht.readTemperature();
Using this case checks whether DHT sensor is working properly or not.
if (isnan(h) || isnan(t)) {
    Serial.println(F("Failed to read from DHT sensor!"));
    return;
  }
And, for printing the coming temperature and humidity data from the sensor on serial monitor.
Serial.print("Humidity: ");  Serial.print(h);
  String fireHumid = String(h) + String("%");
  Serial.print("%  Temperature: ");  Serial.print(t);  Serial.println("°C ");
  String fireTemp = String(t) + String("°C");
 delay(4000);
Now, we are sending the DHT sensor data to Firebase using the path provided by you.
Firebase.pushString("/DHT11/Humidity", fireHumid);
  Firebase.pushString("/DHT11/Temperature", fireTemp);
For confirming that the data is uploading to Firebase or not, we have added the below code.
    if (Firebase.failed()) {
      Serial.print("pushing /logs failed:");
      Serial.println(Firebase.error());
      return;
After uploading your code to Arduino IDE, navigate to your Google’s Firebase account you will see the output will be shown as below.
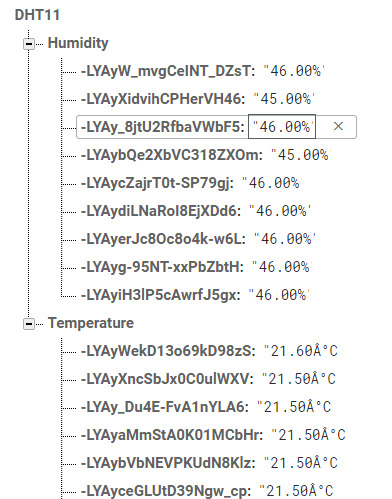
Hence, we have successfully monitored the temperature and humidity data using Google’s firebase. You can also do this monitoring using ThingSpeak.
#include <ESP8266WiFi.h> // esp8266 library
#include <FirebaseArduino.h> // firebase library
#include <DHT.h> // dht11 temperature and humidity sensor library
#define FIREBASE_HOST "your_project_name.firebaseio.com" // Project name address from firebase id
#define FIREBASE_AUTH "FIREBASE_AUTH" // Secret key generated from firebase
#define WIFI_SSID "WiFi Name" // Enter your wifi name
#define WIFI_PASSWORD "WiFi Password" //Enter your wifi password
#define DHTPIN D2 // Digital pin connected to DHT11
#define DHTTYPE DHT11 // Initialize dht type as DHT 11
DHT dht(DHTPIN, DHTTYPE);
void setup() {
Serial.begin(115200);
delay(500);
WiFi.begin(WIFI_SSID, WIFI_PASSWORD);
Serial.print("Connecting to ");
Serial.print(WIFI_SSID);
while (WiFi.status() != WL_CONNECTED) {
Serial.print(".");
delay(500);
}
Serial.println();
Serial.print("Connected to ");
Serial.println(WIFI_SSID);
Serial.print("IP Address is : ");
Serial.println(WiFi.localIP()); // Will print local IP address
Firebase.begin(FIREBASE_HOST, FIREBASE_AUTH); // connect to firebase
dht.begin(); //Start reading dht sensor
}
void loop() {
float h = dht.readHumidity(); // Reading Humidity
float t = dht.readTemperature(); // Read temperature as Celsius
if (isnan(h) || isnan(t)) { // Check if any reads failed.
Serial.println(F("Failed to read from DHT sensor!"));
return;
}
Serial.print("Humidity: "); Serial.print(h);
String fireHumid = String(h) + String("%"); //convert integer humidity to string humidity
Serial.print("% Temperature: "); Serial.print(t); Serial.println("°C ");
String fireTemp = String(t) + String("°C"); //convert integer temperature to string temperature
delay(4000);
Firebase.pushString("/DHT11/Humidity", fireHumid); //setup path and send readings
Firebase.pushString("/DHT11/Temperature", fireTemp); //setup path and send readings
if (Firebase.failed()) {
Serial.print("pushing /logs failed:");
Serial.println(Firebase.error());
return;
}
}


