


Automation has only become possible because of Robots and now they are doing most of the work in industries. Robots are programmed to do repeated tasks, but they can also be operated manually to do some sophisticated tasks like surgeries. But now with the introduction of Artificial Intelligence and IoT, Robots are able to make decisions themselves and able to perform many tasks without any human intervention.
Robots can be controlled wirelessly by various means like Bluetooth, LoRa, Wifi, etc. Here in this tutorial, we will make a Web controlled Robot Car using NodeMCU which can be controlled wirelessly by using internet browser. The webpage will also display the real-time obstacle distance from the robot. So, let’s get started.
Components Required
- NodeMCU (ESP-12e)
- L293D or L298 motor driver IC
- 2 x DC motors
- Ultrasonic Sensors (HC-SR04)
- 12v Battery
- 5v Power supply (optional)
L298D motor driver module has an inbuilt 5v supply but if you are using L293D IC, then you have to make a 5v power supply circuit using 7805 IC.
Circuit Diagram
Complete circuit diagram Wi-Fi controlled car using NodeMCU is given below:

Connections for the circuit is given below:
IN1 pin of L298 -> D6 of NodeMCU
IN2 pin of L298 -> D7 of NodeMCU
IN3 pin of L298 -> D1 of NodeMCU
IN4 pin of L298 -> D3 of NodeMCU
Trig pin of sensor -> D4 of NodeMCU
Echo pin of sensor -> D8 of NodeMCU
Vin of NodeMCU -> 12v battery
5v and GND of sensor -> 5v and GND of L298 module.
12v of L298 module -> 12v battery
To adjust the speed of the motor, use enables pins of a driver module and connect them to the PWM pin of NodeMCU (D2, D5) otherwise connect them to 5v using a jumper.
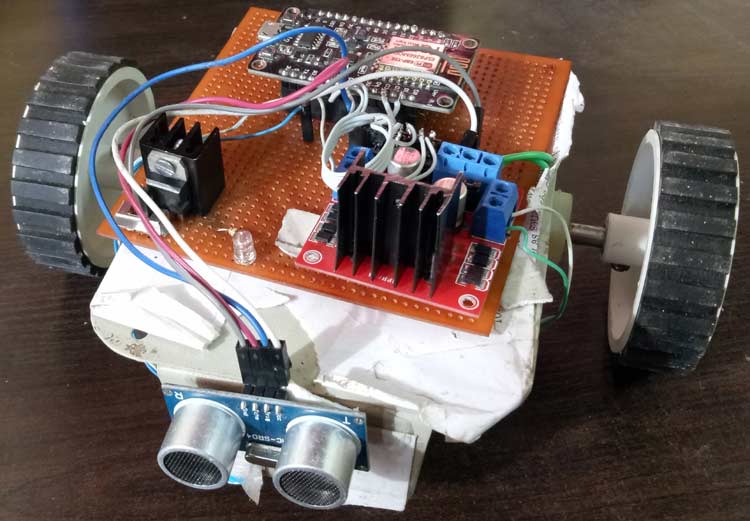
The final setup for Web controlled Robot will look like this

Code and Explanation
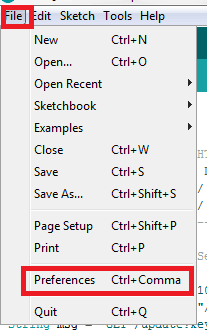
To program NodeMCU with Arduino IDE go to File–>Perferences–>Settings.
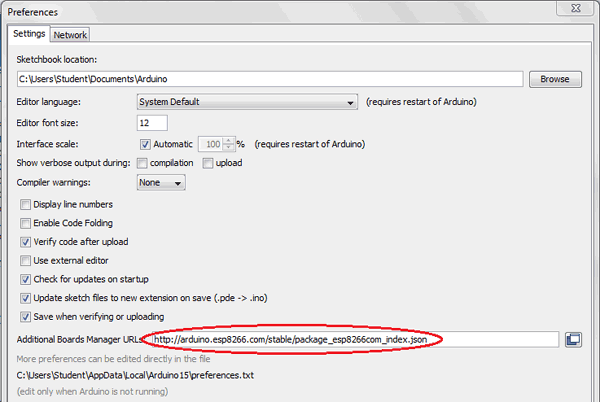
Enter http:// arduino.esp8266.com/stable/package_esp8266com_index.json into ‘Additional Board Manager URL’ field and click ‘Ok’.
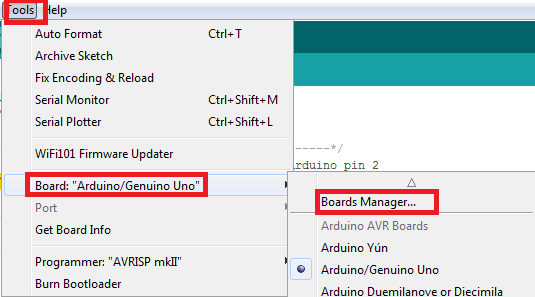
Now go to Tools > Board > Boards Manager.
In Boards Manager window, Type esp in the search box, esp8266 will be listed there below. Now select latest version of board and click on install.
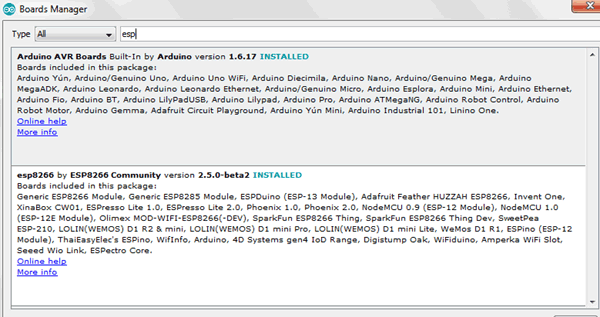
After installation is complete, go to Tools >Board >and select NodeMCU 1.0(ESP-12E Module). Now you can program NodeMCU with Arduino IDE.
We need two libraries to make NodeMCU based local web server. Download these libraries from the given links and install them by going into
Sketch->Include library -> Add .zip Library.
Complete code is given at the end of this tutorial here we are explaining the code step by step.
1. First, include all the required libraries using #include<>
#include <ESP8266WiFi.h>
#include <ESPAsyncTCP.h>
#include <ESPAsyncWebServer.h>
2. Set your Wi-Fi credentials and declare all the required pins of NodeMCU for sensor and motor driver.
const char* ssid = "******";
const char* password = "******";
const int trigP = D4;
const int echoP = D8;
const int MA1 = D6;
const int MA2 = D7;
const int MB1 = D1;
const int MB2 = D3;
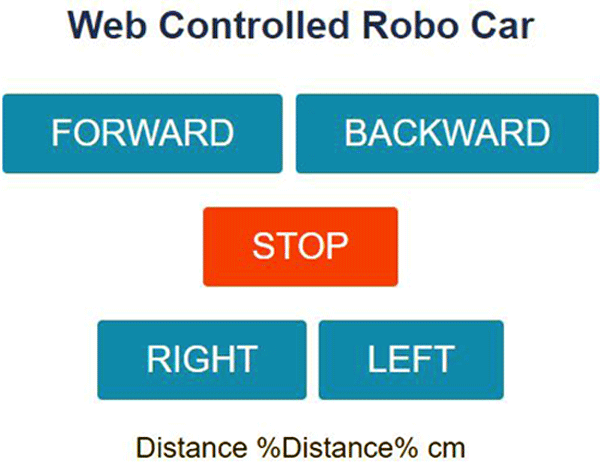
3. Now, we will make an HTML page, which will have 5 buttons to move the robot forward, backward, right, left and stop. The webpage also shows the distance of any obstacle from the robot. This HTML code will be stored in the Program memory using the PROGMEM keyword.
const char index_html[] PROGMEM = R"rawliteral(
<!DOCTYPE HTML><html>
<head>
  <title>Robo control Web Server</title>
  <meta name="viewport" content="width=device-width, initial-scale=1">
  <style>
..
//Css content
..
</style>
<body>
  <h1>Web Controlled Robo Car</h1>
  <p>
    <a href="/forward"><button class="button">FORWARD</button></a>
    <a href="/backward"><button class="button button2">BACKWARD</button></a></p>
..
..
4. Then write a script inside the HTML content which can run after a predefined time to update the distance of the car from the wall. Setinterval function is responsible to update the distance periodically without refreshing the page. Here we will update the distance after every 5 seconds.
<script>
  setInterval(function ( ) {
    var xhttp = new XMLHttpRequest();
    xhttp.onreadystatechange = function() {
..
    xhttp.open("GET", "/distance", true);
    xhttp.send();
  }, 5000 ) ;
</script></html>)rawliteral";
5. Now, make a function to calculate the distance from the wall. We can calculate the distance using the speed of sound multiply by the time taken to receive the sound to the receiver.
String getDistance() {
 digitalWrite(trigP, LOW);
delayMicroseconds(2);
digitalWrite(trigP, HIGH);
delayMicroseconds(10);
digitalWrite(trigP, LOW);
duration = pulseIn(echoP, HIGH);
distance= duration*0.034/2;
Serial.print("Distance = ");
Serial.println(distance);
  return String(distance);
}
6. In the void setup function, connect the module with Wi-Fi and also check for the incoming message from the server. Initialize serial communication with 115200 baud rate and check for the given Wi-Fi network and print the IP address.
void setup(){
  Serial.begin(115200);
WiFi.begin(ssid, password);
  while (WiFi.status() != WL_CONNECTED) {
    delay(1000);
    Serial.println(“*”);
  }
  Serial.println(WiFi.localIP());
Now, send the webpage with input fields to the client computer.
  server.on("/", HTTP_GET, [](AsyncWebServerRequest *request){
    request->send_P(200, "text/html", html_page);
  });
Check for the input URL from the client-server and make the GPIO HIGH/LOW on the basis of direction.
server.on("/forward", HTTP_GET, [](AsyncWebServerRequest *request){
  digitalWrite(MA1,HIGH);
  digitalWrite(MA2,LOW);
  digitalWrite(MB1,HIGH);
  digitalWrite(MB2,LOW);
    request->send(200, "text/html", index_html);
  });
Similarly, call server.on() for other directions and for updating the distance shown on the webpage
server.on("/distance", HTTP_GET, [](AsyncWebServerRequest *request){
    request->send_P(200, "text/plain", getDistance().c_str());
  });
Complete code along with a demonstration video is given at the end of this tutorial.
Testing the Wi-Fi controlled robot using NodeMCU
Connect the NodeMCU with the laptop/PC using the USB cable and choose the board from the tools menu and upload the code. Make sure your module and laptop/PC are connected with same Wi-Fi network.
Now, open the serial monitor. Here you will see the IP address of your NodeMCU. Copy this IP and paste in the address field of browser.

After entering the IP address in the browser, the webpage, with all the 5 buttons, will be loaded on the screen.
Now, you can control your Robot car using the web browser from anywhere. For making the car more advance you can add more ultrasonic sensors to all the sides of the bot and can also adjust the speed of the car by sending the speed value using the HTML forms that we have used in Smart notice board project.
#include <ESP8266WiFi.h>
#include <ESPAsyncTCP.h>
#include <ESPAsyncWebServer.h>
long duration;
int distance;
const int trigP = D4;
const int echoP = D8;
const char* ssid = "******";
const char* password = "******";
const int trigP = D4;
const int echoP = D8;
const int MA1 = D6;
const int MA2 = D7;
const int MB1 = D1;
const int MB2 = D3;
// Create AsyncWebServer object on port 80
AsyncWebServer server(80);
String getDistance() {
digitalWrite(trigP, LOW); // Makes trigPin low
delayMicroseconds(2); // 2 micro second delay
digitalWrite(trigP, HIGH); // tigPin high
delayMicroseconds(10); // trigPin high for 10 micro seconds
digitalWrite(trigP, LOW); // trigPin low
duration = pulseIn(echoP, HIGH); //Read echo pin, time in microseconds
distance= duration*0.034/2; //Calculating actual/real distance
Serial.print("Distance = "); Serial.println(distance);
return String(distance);
}
const char index_html[] PROGMEM = R"rawliteral(
<!DOCTYPE HTML><html>
<head>
<title>Robo control Web Server</title>
<meta name="viewport" content="width=device-width, initial-scale=1">
<style>
html {
font-family: Arial;
display: inline-block;
margin: 0px auto;
text-align: center;
}
h1 {
color: #0F3376;
padding: 2vh;
}
p {
font-size: 1.5rem;
}
.button {
display: inline-block;
background-color: #008CBA;
border: none;
border-radius: 4px;
color: white;
padding: 16px 40px;
text-decoration: none;
font-size: 30px;
margin: 2px;
cursor: pointer;
}
.button3 {
background-color: #f44336;
}
</style>
</head>
<body>
<h1>Web Controlled Robo Car</h1>
<p>
<a href="/forward"><button class="button">FORWARD</button></a>
<a href="/backward"><button class="button button2">BACKWARD</button></a></p>
<p> <a href="/stop"><button class="button button3">STOP</button></a></p>
<p> <a href="/right"><button class="button button4">RIGHT</button></a>
<a href="/left"><button class="button button5">LEFT</button></a>
</p>
<p>
<span class="sensor-labels">Distance</span>
<span id="distance">%Distance% cm</span>
</p>
</body>
<script>
setInterval(function ( ) {
var xhttp = new XMLHttpRequest();
xhttp.onreadystatechange = function() {
if (this.readyState == 4 && this.status == 200) {
document.getElementById("distance").innerHTML = this.responseText;
}
};
xhttp.open("GET", "/distance", true);
xhttp.send();
}, 5000 ) ;
</script></html>)rawliteral";
void setup(){
Serial.begin(115200);
pinMode(trigP, OUTPUT);
pinMode(echoP, INPUT);
pinMode(MA1, OUTPUT);
pinMode(MA2, OUTPUT);
pinMode(MB1, OUTPUT);
pinMode(MB2, OUTPUT);
pinMode(ENA, OUTPUT);
pinMode(ENB, OUTPUT);
// Connect to Wi-Fi
WiFi.begin(ssid, password);
while (WiFi.status() != WL_CONNECTED) {
delay(1000);
Serial.println("..");
}
Serial.println(WiFi.localIP());
server.on("/", HTTP_GET, [](AsyncWebServerRequest *request){
request->send_P(200, "text/html", index_html);
});
server.on("/forward", HTTP_GET, [](AsyncWebServerRequest *request){
digitalWrite(MA1,HIGH);
digitalWrite(MA2,LOW);
digitalWrite(MB1,HIGH);
digitalWrite(MB2,LOW);
request->send(200, "text/html", index_html);
});
server.on("/backward", HTTP_GET, [](AsyncWebServerRequest *request){
digitalWrite(MA1,LOW);
digitalWrite(MA2,HIGH);
digitalWrite(MB1,LOW);
digitalWrite(MB2,HIGH);
request->send(200, "text/html", index_html);
});
server.on("/stop", HTTP_GET, [](AsyncWebServerRequest *request){
digitalWrite(MA1,LOW);
digitalWrite(MA2,LOW);
digitalWrite(MB1,LOW);
digitalWrite(MB2,LOW);
request->send(200, "text/html", index_html);
});
server.on("/right", HTTP_GET, [](AsyncWebServerRequest *request){
digitalWrite(MA1,HIGH);
digitalWrite(MA2,LOW);
digitalWrite(MB1,LOW);
digitalWrite(MB2,HIGH);
request->send(200, "text/html", index_html);
});
server.on("/left", HTTP_GET, [](AsyncWebServerRequest *request){
digitalWrite(MA1,LOW);
digitalWrite(MA2,HIGH);
digitalWrite(MB1,HIGH);
digitalWrite(MB2,LOW);
request->send(200, "text/html", index_html);
});
server.on("/distance", HTTP_GET, [](AsyncWebServerRequest *request){
request->send_P(200, "text/plain", getDistance().c_str());
});
// Start server
server.begin();
}


