


Currency note counter is a machine that detects the notes of different denominations and tells its value. Here in this IoT project, we are using a color sensing technique to detect the note value. So, here we will use the TCS230 color sensor with NodeMCU ESP8266 to detect the currency value and display the same on a webpage as well as on 16x2 LCD. NodeMCU ESP8266 is a very popular Wi-Fi module, we previously built many IoT projects using NodeMCU ESP8266.
In IoT based applications, Webservers are used to control or monitor any sensor values using web browsers, we previously created many webservers using Arduino, ESP8266, NodeMCU, ESP32, Raspberry Pi, etc.
Required Components
- ESP8266 NodeMCU
- TCS230 Colour sensor
- IR sensor
- Breadboard
- Power supply
- 16*2 Alphanumeric LCD
- I2C Shield for 16*2 LCD
- Connecting Wires
TCS230 Colour Sensor Working
The TCS230 colour sensor is used to sense a wide range of colours. The applications of this sensor can be colour sorting of products, colour matching, etc.
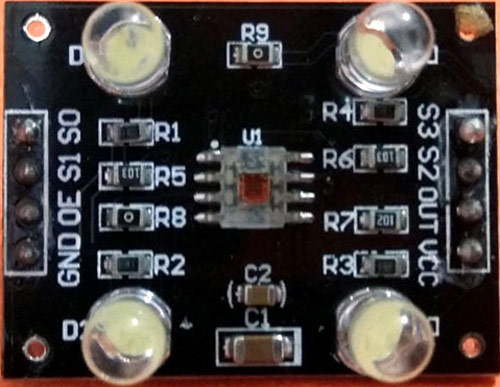
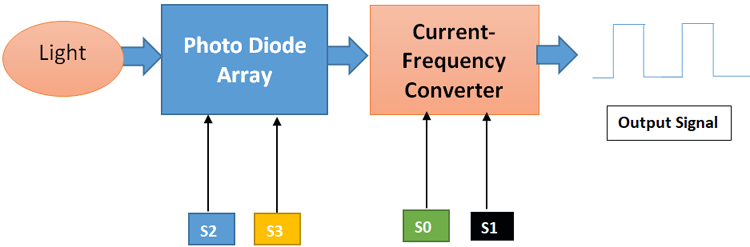
This sensor uses an array of photodiodes with red, green, and blue colour filters along with a clear filter. It also has inbuilt infrared LEDs that are used to light up the object whose colour is to be detected. This ensures that there will be no impact of external surrounding light on the object. This sensor reads a photodiode of 8*8 array, which comprises 16 photodiodes with red filters, 16 with blue filters, and 16 with green filters also 16 photodiodes without any color filter.
The output signal of the TCS230 colour sensor is a square wave with a 50% duty cycle and its frequency is proportional to the light intensity of the selected filter.
Pin Description:
- VDD- Voltage supply pin of Sensor. It is supplied with 5V DC.
- GND- Ground reference pin of a colour sensor
- S0, S1- Output frequency scaling selection inputs
- S2, S3- Photo-diode type selection inputs
- OUT- Output pin of a colour sensor
- OE-Enable pin for output frequency
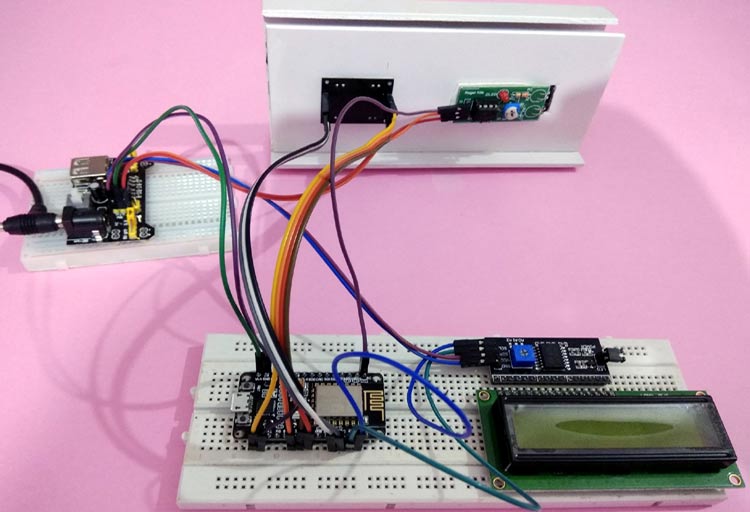
Currency Counter Machine Circuit Diagram

Programming Explanation
After the successful completion of the hardware setup, now it’s time to program the ESP8266 NodeMCU.
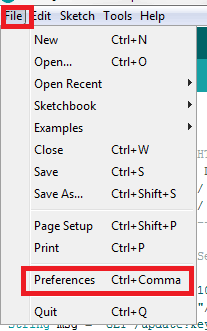
To upload code into NodeMCU using Arduino IDE, follow the steps below:
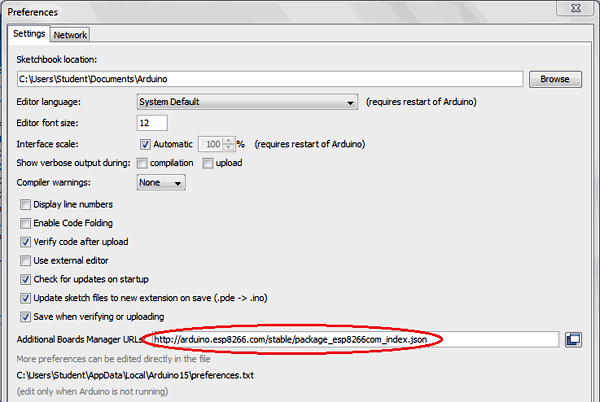
1. Open Arduino IDE, then go to File–>Preferences–>Settings.
2. Type https://arduino.esp8266.com/stable/package_esp8266com_index.json in the ‘Additional Board Manager URL’ field and click ‘Ok’.
3. Now go to Tools > Board > Boards Manager. In the Boards Manager window, Type ESP8266 in the search box, select the latest version of the board and click on install.

4. After installation is complete, go to Tools ->Board -> and select NodeMCU 1.0(ESP-12E Module). Now you can program NodeMCU with Arduino IDE.
First, include all the required library files in the code as shown below:
#include <ESP8266WiFi.h>
#include <WiFiClient.h>
#include <ESP8266WebServer.h>
#include <LiquidCrystal_I2C.h>
#include<Wire.h>
Then create the ESP8266WebServer class object with the name server and default port number 80.
ESP8266WebServer server (80);
Now, declare the network credentials, i.e SSID and password. It is required to connect NodeMCU to the internet.
const char* ssid = "admin";
const char* password = "12345678";
For using the I2C module for 16*2 Alphanumeric LCD, we have configured it using the LiquidCrystal_I2C class. Here we have to pass the address which is 0x27 (in our case) and row, column numbers which are 2 and 16 in our case.
LiquidCrystal_I2C lcd(0x27, 16, 2);
Inside setup (), print a welcome message on LCD, then define all the data directions of digital pins used in this project. Then, set the output frequency scaling of a colour sensor. In my case, it is set to 20% which can be done by giving HIGH pulse to S0 and LOW pulse to S1.
  pinMode(D3, OUTPUT);//S0
  pinMode(D4, OUTPUT);//S1
  pinMode(D5, OUTPUT);//S2
  pinMode(D6, OUTPUT);//S3
  pinMode(D7, INPUT);//OUT
  digitalWrite(D3, HIGH);
  digitalWrite(D4, LOW);
  Serial.begin(9600);
  Wire.begin(D2, D1);
  lcd.begin(16, 2);
  lcd.init();
  lcd.backlight();
  lcd.setCursor(3, 0);
  lcd.print("WELCOME TO       ");
  lcd.setCursor(3, 1);
  lcd.print("IOT DESIGN       ");
  delay(2000);
  lcd.clear();
Then, to connect NodeMCU to the internet, call WiFi.begin and pass network SSID and password as its arguments. Check for the successful network connection using WiFi.status() and after a successful connection, print a message on LCD with IP address.
WiFi.begin(ssid, password);
while (WiFi.status() != WL_CONNECTED)
{
delay(500);
lcd.setCursor(0, 0);
lcd.print("WiFi connecting... ");
}
lcd.setCursor(0, 0);
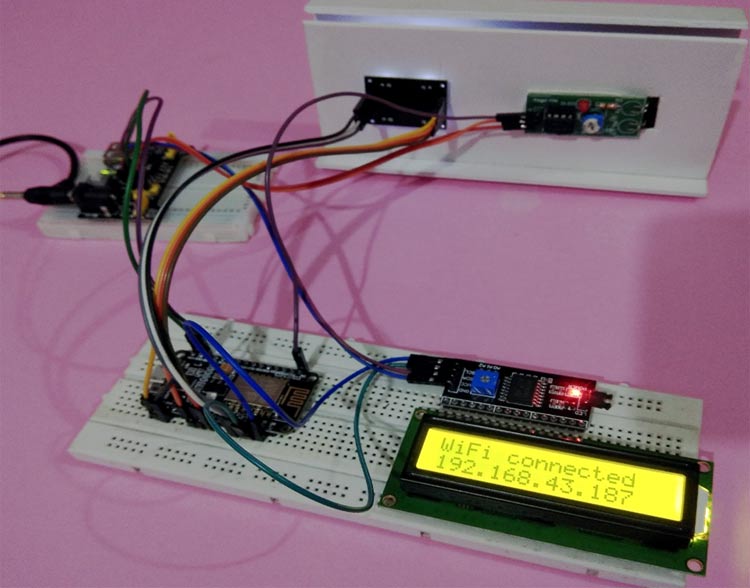
lcd.print("WiFi connected ");
lcd.setCursor(0, 1);
lcd.print(WiFi.localIP());
delay(1500);
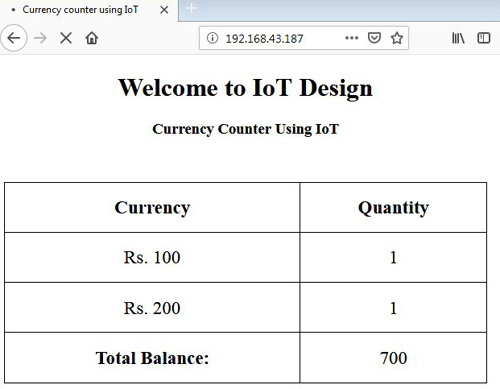
Then, write an HTML code to display the Currency usage and Total balance on the webpage. Then assign the HTML code to a String variable using a server.on(), and then send it to the client-side when the user request for it using the IP address.
server.on("/", []()
  {
    page = "<html><head><title>Currency counter using IoT</title>";
    page += "</head><style type=\"text/css\">table {border-collapse: collapse;";
    page += "}table, th, td {border: 1px solid black;font-size: larger;";
    page += "text-align:center;}</style><body><center><h1>Welcome to IoT ";
    page += "Design</h1><h3>Currency Counter Using IoT</h3><br><br>";
    page += "<table style=\"width: 600px;height: 250px;\"><tr><th>Currency</th";
    page += "><th>Quantity</th></tr><tr><td>Rs. 100</td><td>" + String(count_100) + "</td></tr><tr>";
    page += "<td>Rs. 200</td><td>" + String(count_200) + "</td></tr><tr><th>Total Balance:</th><td>";
    page += String(total) + "</td></tr></table></center></body></html>";
    page += "<meta http-equiv=\"refresh\" content=\"2\">";
    server.send(200, "text/html", page);
  });
To start the webserver, use the server.begin(), which will begin the server at the default port number.
server.begin();
Inside infinite loop (), first, we need to read all the data output from the sensors. The output from the IR sensor can be found by reading the A0 pin. Here the IR sensor is used to sense the presence of currency inside the slot and if there is a note, then the colour sensor will detect the color of the Note and send the color value to NodeMCU. And NodeMCU further calculates the currency value based on the color of the note. Then the output colour frequencies can be found by calling the individual functions written as red (), blue () and green ().
  int sensor = analogRead(A0);
  int red1 = red();
  int blue1 = blue();
  int green1 = green();
Next, write the conditions to check the output frequency of the colour sensor with the reference frequency which we have set before. If it matches, then deducts the specified amount from our wallet.
if (red1 >= 45 && red1 <= 65 && blue1 >= 80 && blue1 <= 99 && green1 >= 75 && green1 <= 95 && a == 0 && sensor > 500)
  {
    a = 1;
  }
  else if (sensor <= 500 && a == 1)
  {
    a = 0;
    if (total >= 200)
    {
      lcd.setCursor(0, 1);
      lcd.print("200 Rupees!!!");
      total = total - 200;
      delay(2000);
      count_200++;
      lcd.clear();
    }
  }
This statement is written to show the available balance in the wallet on the LCD display.
  lcd.setCursor(0, 0);
  lcd.print("Total Bal:");
  lcd.setCursor(11, 0);
  lcd.print(total);
  delay(1000);
The following function is written to get the output colour frequency of red content in the currency. Similarly, we can write other functions to get value for blue and green colour contents.
int red()
{
  digitalWrite(D5, LOW);
  digitalWrite(D6, LOW);
  frequency = pulseIn(OutPut, LOW);
  return frequency;
}
Finally, to handle the client request, call the function server.handleClient(). It will handle new requests and check them.
server.handleClient();
Note:
- The frequency output may be different in your case depending on the external lighting and sensor setup. So it is recommended to check the output frequency of your currency and set the reference value accordingly.
- Here we have used only 100 and 200 rupees currency notes. But we can also use all other currencies using their color frequency output values.
IoT Currency Sensor Machine- Demonstration
Finally, upload the code in NodeMCU using Arduino IDE and start swapping any currency note to test the machine. The webpage will show the current note value and the remaining balance in the wallet.
By enabling the port forwarding in the router, this page can be accessed from anywhere in the world.
Complete code and Demo video are given below.
#include<ESP8266WiFi.h>
#include<WiFiClient.h>
#include<ESP8266WebServer.h>
#include<LiquidCrystal_I2C.h>
#include<Wire.h>
LiquidCrystal_I2C lcd(0x27, 16, 2);
const char* ssid = "admin";
const char* password = "12345678";
ESP8266WebServer server(80);
String page = "";
int count_100 = 0;
int count_200 = 0;
unsigned int frequency = 0;
int a = 0, b = 0;
int total = 1000;
int blue1,red1,green1;
void setup()
{
pinMode(D3, OUTPUT);//S0
pinMode(D4, OUTPUT);//S1
pinMode(D5, OUTPUT);//S2
pinMode(D6, OUTPUT);//S3
pinMode(D7, INPUT);//OUT
digitalWrite(D3, HIGH);
digitalWrite(D4, LOW);
Serial.begin(9600);
Wire.begin(D2, D1);
lcd.begin(16, 2);
lcd.init();
lcd.backlight();
lcd.setCursor(3, 0);
lcd.print("WELCOME TO ");
lcd.setCursor(3, 1);
lcd.print("IOT DESIGN ");
delay(2000);
lcd.clear();
WiFi.begin(ssid, password);
while (WiFi.status() != WL_CONNECTED)
{
delay(500);
lcd.setCursor(0, 0);
lcd.print("WiFi connecting... ");
}
lcd.setCursor(0, 0);
lcd.print("WiFi connected ");
lcd.setCursor(0, 1);
lcd.print(WiFi.localIP());
delay(1500);
lcd.clear();
server.on("/", []()
{
page = "<html><head><title>Currency counter using IoT</title>";
page += "</head><style type=\"text/css\">table {border-collapse: collapse;";
page += "}table, th, td {border: 1px solid black;font-size: larger;";
page += "text-align:center;}</style><body><center><h1>Welcome to IoT ";
page += "Design</h1><h3>Currency Counter Using IoT</h3><br><br>";
page += "<table style=\"width: 600px;height: 250px;\"><tr><th>Currency</th";
page += "><th>Quantity</th></tr><tr><td>Rs. 100</td><td>" + String(count_100) + "</td></tr><tr>";
page += "<td>Rs. 200</td><td>" + String(count_200) + "</td></tr><tr><th>Total Balance:</th><td>";
page += String(total) + "</td></tr></table></center></body></html>
page += "<meta http-equiv=\"refresh\" content=\"2\">";
server.send(200, "text/html", page);
});
server.begin();
}
void loop()
{
int sensor = analogRead(A0);
int red1 = red();
int blue1 = blue();
int green1 = green();
if (red1 >= 50 && red1 <= 75 && blue1 >= 90 && blue1 <= 120 && green1 >= 85 && green1 <= 120 && a == 0 && sensor > 500)
{
a = 1;
}
else if (sensor <= 500 && a == 1)
{
a = 0;
if (total >= 200)
{
lcd.setCursor(0, 1);
lcd.print("200 Rupees!!!");
total = total - 200;
delay(2000);
count_200++;
lcd.clear();
}
}
if (red1 >= 75 && red1 <= 100 && blue1 >= 100 && blue1 <= 120 && green1 >= 65 && green1 <= 85 && b == 0 && sensor > 500)
{
b = 1;
}
else if (sensor <= 500 && b == 1)
{
b = 0;
if (total >= 100)
{
lcd.setCursor(0, 1);
lcd.print("100 Rupees!!!");
total = total - 100;
count_100++;
delay(2000);
lcd.clear();
}
}
lcd.setCursor(0, 0);
lcd.print("Total Bal:");
lcd.setCursor(11, 0);
lcd.print(total);
delay(1000);
server.handleClient();
}
int red()
{
digitalWrite(D5, LOW);
digitalWrite(D6, LOW);
frequency = pulseIn(D7, LOW);
return frequency;
}
int blue()
{
digitalWrite(D5, HIGH);
digitalWrite(D6, HIGH);
frequency = pulseIn(D7, LOW);
return frequency;
}
int green()
{
digitalWrite(D5, LOW);
digitalWrite(D6, HIGH);
frequency = pulseIn(D7, LOW);
return frequency;
}


