


In this project, we will build an IoT based weather monitoring system that can wirelessly display the temperature and humidity on our smartphone. Only we need steady internet to connect our module to the internet.
We are using Raspberry Pi Pico W as a microcontroller which has inbuilt WiFi capabilities. The Raspberry Pi Pico W is an affordable development board powered by the RP2040 microcontroller. It features built-in 2.4 GHz WIFI, enabling wireless connectivity. With the Infineon CYW43439 WIFI+ BLE chip, which incorporates a single-band 2.4 GHz wireless interface (802.11n). This allows users to create AIoT solutions for wireless control and remote monitoring. The microcontroller supports programming in Micropython and C/C++.
If you wish to learn more about Raspberry Pi Pico W, you can refer to manufacturer stats using this link.
We will be going to create a Webpage where all the sensor data will be displayed and can be monitored. For measuring the Temperature and humidity we are using a so-called famous sensor named “DHT11”.
For all these sensor and web programming we are using Arduino IDE to program our Microcontroller. It might be surprising to those who don’t know about programming Raspberry Pi Pico W in Arduino IDE. But it is possible to program it in Arduino IDE using C/C++.
Previously, we previously built many IoT based Weather Station using other microcontrollers and cloud services,
- Solar Powered Wi-Fi Weather Station using NodeMCU and ThingSpeak
- IoT Based Raspberry Pi Weather Station using DHT11 and BMP180 Sensor
- IoT based ESP32 Wi-Fi Weather Station using DHT11 and BMP180 Sensor
- IoT Wireless Weather Station using Arduino, ESP8266 and ThingSpeak
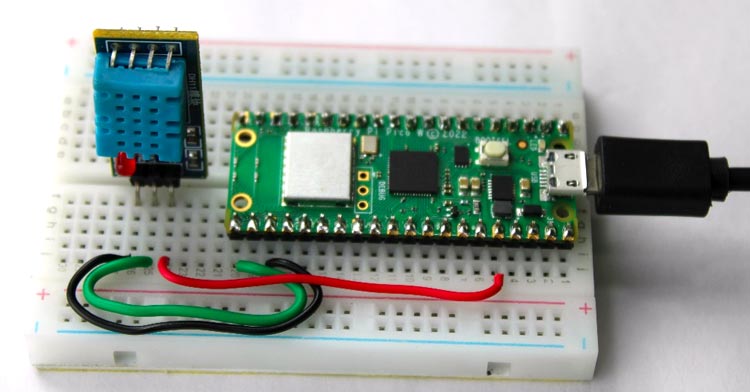
Components Required for Weather Station
- Raspberry Pi Pico W
- DHT11 sensor
- Jumper Wires
- Breadboard
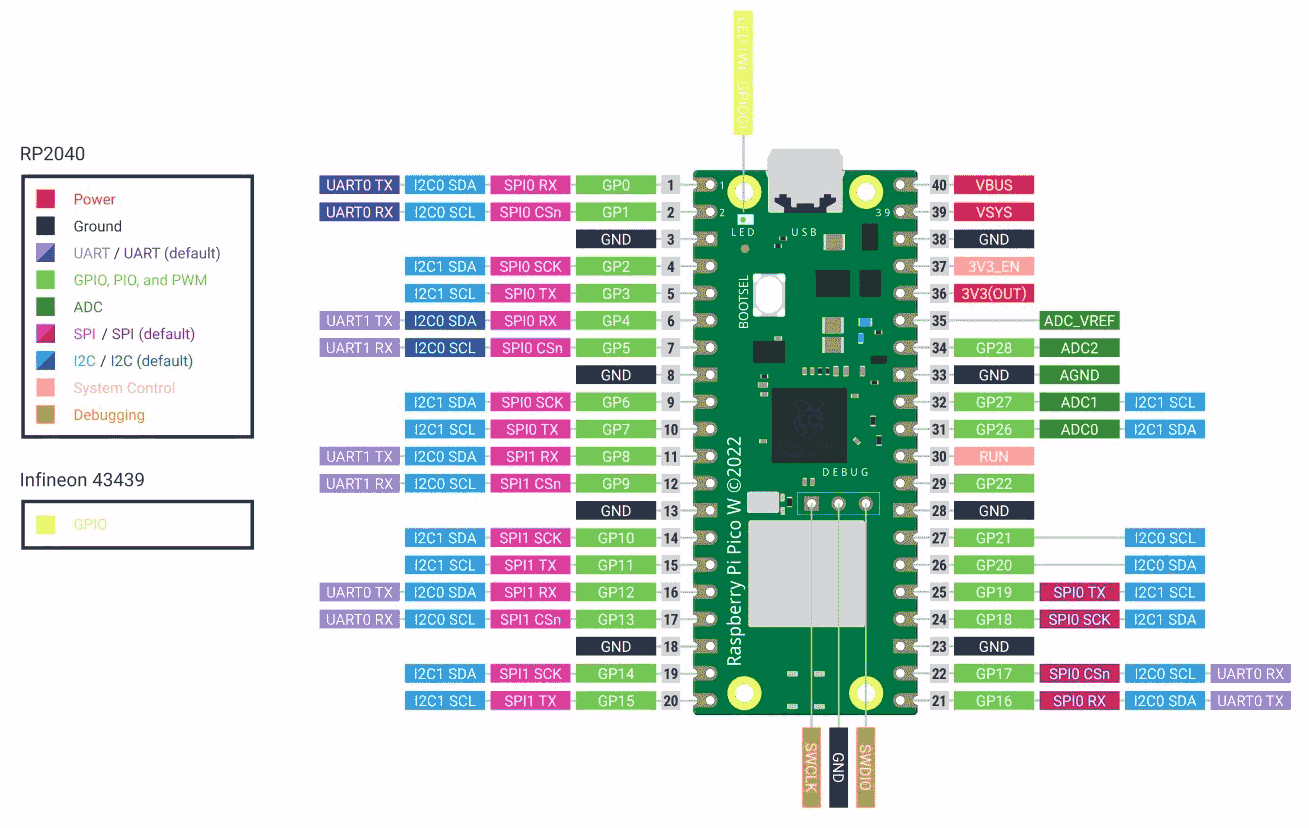
Raspberry Pi Pico W Pinout
There are a total of 40 pin terminals at the side of the Module Board, of which a total of 26 are GPIO pins including three ADC pins. The rest of them include power, ground, and reference pins.
Weather Station Circuit Diagram
The circuit connection is very easy to understand and implement. The below Image shows a comprehensive circuit diagram.
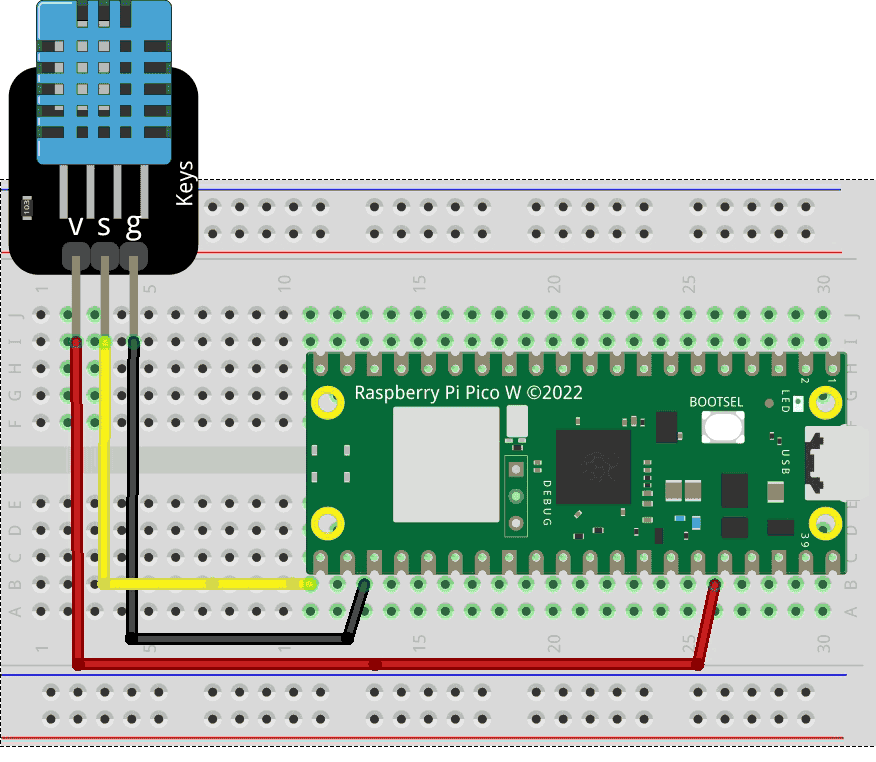
Let’s see how the connections work:
DHT11 has three terminals which are VCC, GND, and Signal. Connect Vcc to 3.3v output supply of Board which is on pin 36. Similarly, connect GND to the Ground of the board which is on Pin 23. There are various terminals for the Ground on board you can choose any one of them.
The Signal Pin should be connected to any Digital GPIO pin of the Pico Board as we connect it to GPIO 16.
Programming Raspberry Pi Pico W with Arduino IDE
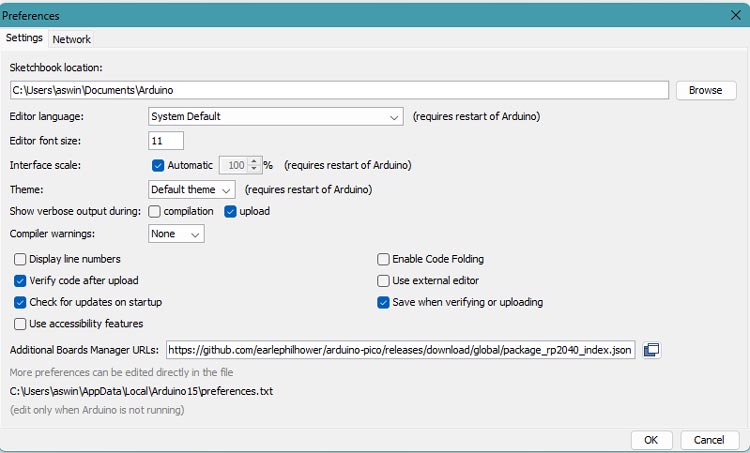
Let’s look at how can we use Arduino IDE to program the Raspberry Pi Pico W board. For that, we need to install the Raspberry Pi RP2040 board package which has support for Raspberry Pi Pico W. If it is already installed leave the installation process.
- Open Arduino IDE, and go to File > Preferences. Now paste the given link in the Additional Boards Manager URLs and save by pressing Ok.
https://github.com/earlephilhower/arduino-pico/releases/download/global/package_rp2040_index.json
- Open the Arduino IDE, navigate to Boards Manager, and search “Pico”. You will find the package with the board name, install it.
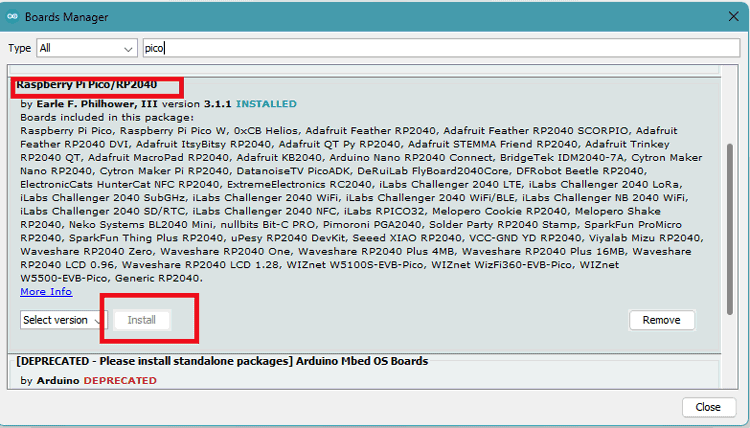
- Now, select the board as Raspberry Pi Pico W and leave the remaining things as it is.
- Copy and compile the example code provided below at last.
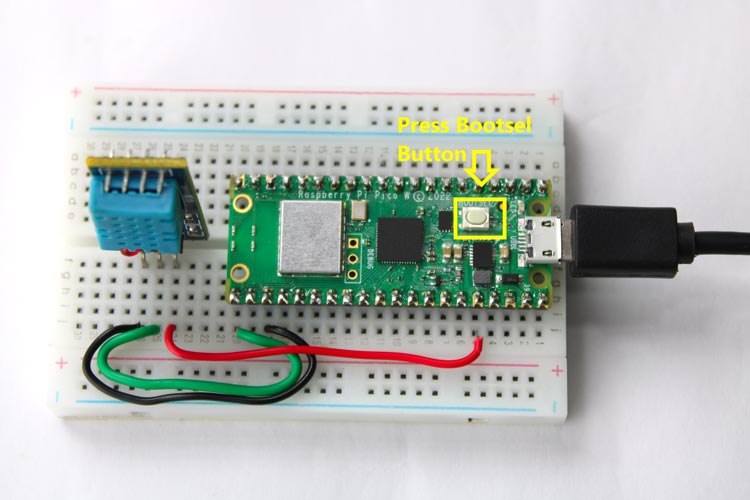
- To upload the code, you have to connect the Pico W board to the computer which shows in any COM Port. For that, while pressing and holding the BOOTSEL button on the Pico W, immediately connect Board to your computer using a micro-USB cable. Release the BOOTSEL button the if RPI-RP2 drive notification appears on your computer.
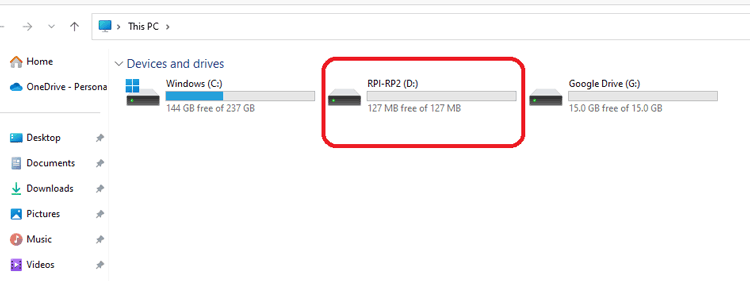
Hence, the below Image shows the RP1-RP2 drive in File Manager which means the drive-in boot mode. Hence the device is ready to take code/firmware.
- Upload the compiled code to the Pico W board by choosing the correct port.
- After successfully uploading the code, open the serial monitor and set the baud rate to 115200.
Arduino Programming Code Explanation
The project code is easy to understand as we are reading the sensor data and publishing it to the web server, so our code must include connecting to WiFi, reading sensor data, and creating a web page.
Firstly, we have to include all the necessary basic libraries Wifi.h & DHT.h. Successfully connecting the board to the internet using WiFi is necessary to access the web page. For that, we use the library WiFi.h to connect Pico W board to a WIFI connection. The library has all the necessary functions for connecting and communicating over a WiFi network. We need to pass our login credentials including SSID and Password to join an encrypted network.
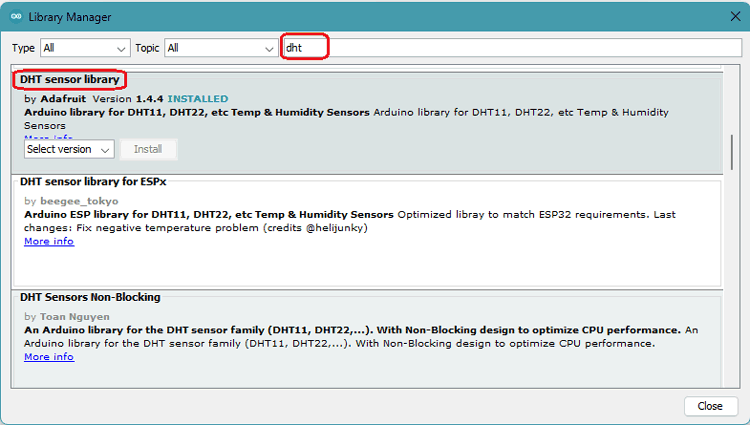
Installing DHT Library:
DHT library must be included to read digital output data of the sensor. The library makes it easy to handle such types of sensors, only you need to define certain pins, and calling some functions will give you access to the ready data.
- Go to the library manager of your Arduino by Sketch> include libraries> manage libraries.
- Search for “DHT” and you will find after scrolling, the library named “DHT sensor library” by Adafruit.
- Install it and that’s how easy Library Installation is.
#include <WiFi.h>
#include <DHT.h>
const char* ssid = "Semicon Media 2.4";      // Updated Wi-Fi network SSID
const char* password = "cdfiP29to665";       // Updated Wi-Fi network password
#define DHTPIN 16                            // Digital pin connected to the DHT sensor
DHT dht(DHTPIN, DHT11);
WiFiServer server(80);
- We have also defined the necessary variable and Objects to be used in further Programming. We have defined the DHT11 sensor signal pin as connected to GPIO pin 16 of the Pico Board.
- Created the required variables to store the WiFi connection SSID and Password. You have to change it as per your WiFi credentials to successfully connect to the network.
- We create a WiFiServer object named “server”. And we pass the HTTP port no. 80 as a parameter.
void setup() {
Serial.begin(115200);
WiFi.begin(ssid, password);
while (WiFi.status() != WL_CONNECTED)
{ delay(1000);
Serial.println("Connecting to WiFi...");
}
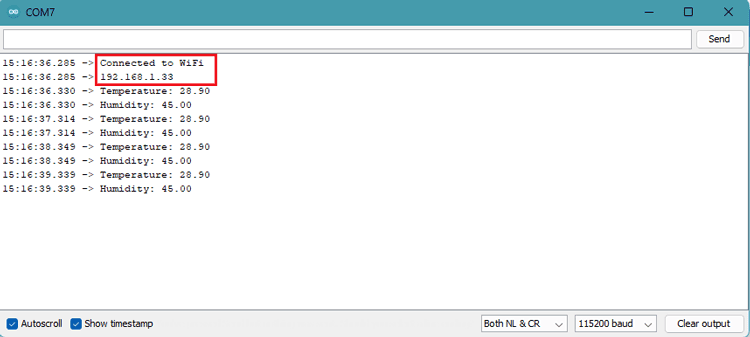
Serial.println("Connected to WiFi");
Serial.println(WiFi.localIP());
dht.begin();
server.begin();
}
Inside the setup() function, we initialize the hardware serial communication at a baud rate of 115200. WiFi.begin() function initializes the WiFi by taking SSID & Password as a parameter.
After, a successful connection to the WiFi network, the IP Address will display on Serial Monitor.
dht.begin() initializes the sensor to communicate with the microcontroller. Similarly, we start the Server object of class WIFI Server using command server.begin().
void loop() {
float humidity = dht.readHumidity();
float temperature = dht.readTemperature();
Serial.println("Temperature: "+(String)temperature);
Serial.println("Humidity: "+(String)humidity);
delay(1000);
WiFiClient client = server.available();
if (client) {
Serial.println("New client connected");
String response = "HTTP/1.1 200 OK\r\nContent-Type: text/html\r\n\r\n";
response += "<!DOCTYPE html><html><body>";
response += "<head><meta name=\"viewport\" content=\"width=device-width, initial-scale=1.0, user-scalable=no\">\n";
response += "<style>html { font-family: Helvetica; display: inline-block; margin: 0px auto; text-align: center;}\n";
response += "body{margin-top: 50px;} h1 {color: #444444;margin: 50px auto 30px;}\n";
response += "p {font-size: 24px;color: #444444;margin-bottom: 10px;}\n";
response += "</style>\n";
response += "</head>\n";
response += "<body>\n";
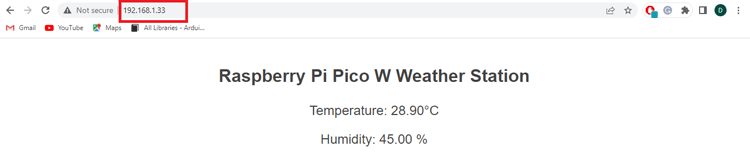
response += "<h1>Raspberry Pi Pico W Weather Station</h1>";
response += "<p>Temperature: <span id=\"temperature\"></span>" + String(temperature)+ "°C</p>";
response += "<p>Humidity: <span id=\"humidity\"></span> " + String(humidity) + " %</p>";
response += "</body></html>";
client.print(response);
delay(10);
client.stop();
Serial.println("Client disconnected");
}
}
Inside the Loop function, initially, we read the temperature & humidity by calling functions readHumidity() and readTemperature() of class DHT and displaying it to the serial monitor for testing purposes.
Web Server Building
Whenever the web server receives a request from a web client, it will print “New Client Connected” and generates a web page. It simply concatenates HTML code into a long string and prints the response. The function uses temperature and humidity variables readings as strings using typecasting which we accessed earlier.
Firstly, we always need <!DOCTYPE> Declaration to indicate that we are sending HTML code.
response += "<!DOCTYPE html><html><body>";
The <meta> element makes the web page responsive in your browser.
response += "<head><meta name=\"viewport\" content=\"width=device-width, initial-scale=1.0, user-scalable=no\">\n";
We add some CSS to style the overall look of the web page. We choose a font as Helvetica without margin with center alignment. Also, we style for the body, h1, and p tags.
response += "<style>html { font-family: Helvetica; display: inline-block; margin: 0px auto; text-align: center;}\n";
response += "body{margin-top: 50px;} h1 {color: #444444;margin: 50px auto 30px;}\n";
response += "p {font-size: 24px;color: #444444;margin-bottom: 10px;}\n";
response += "</style>\n";
response += "</head>\n";
response += "<body>\n";
Then the web page heading is defined, you can change the heading according to your choice.
response += "<h1>Raspberry Pi Pico W Weather Station</h1>";
Then we use the String typecasting values of Temperature and Humidity to display it on web page.
response += "<p>Temperature: <span id=\"temperature\"></span>" + String(temperature)+ "°C</p>"; response += "<p>Humidity: <span id=\"humidity\"></span> " + String(humidity) + " %</p>";
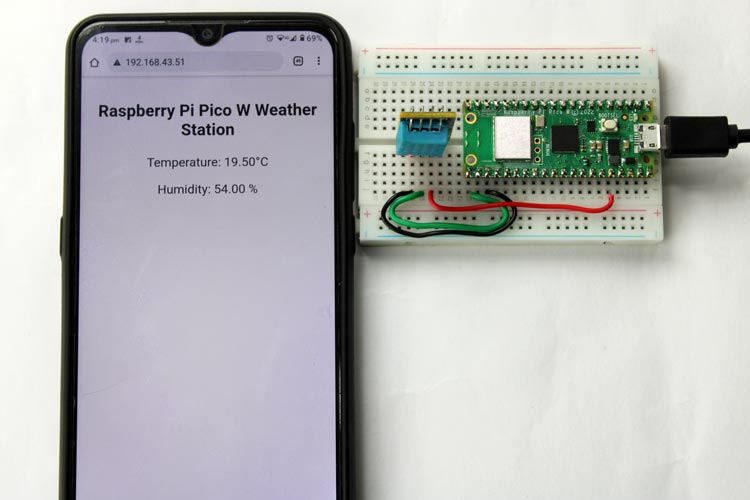
Demonstration of Weather Station
Upload the code to the Raspberry Pi Pico W by properly following the steps discussed above. Keep in mind to add all the necessary libraries for successful execution without any errors.
- Open the serial Monitor, set the correct baud rate and check for the WiFi connection and wait until it displays the IP Address.
- Open the Browser on the device which must be connected to the same WiFi network as Pico Board, and go to the IP Address to access the webpage.
- You need to refresh the page to get the updated data on the web page.
We hope you enjoyed the project and found it useful. If you have any questions, please feel free to leave them in the comment section below.
#include <WiFi.h>
#include <DHT.h>
const char* ssid = "Semicon Media 2.4"; // Updated Wi-Fi network SSID
const char* password = "cdfiP29to665"; // Updated Wi-Fi network password
#define DHTPIN 16 // Digital pin connected to the DHT sensor
DHT dht(DHTPIN, DHT11);
WiFiServer server(80);
void setup() {
Serial.begin(115200);
WiFi.begin(ssid, password);
while (WiFi.status() != WL_CONNECTED)
{ delay(1000);
Serial.println("Connecting to WiFi...");
}
Serial.println("Connected to WiFi");
Serial.println(WiFi.localIP());
dht.begin();
server.begin();
}
void loop() {
float humidity = dht.readHumidity();
float temperature = dht.readTemperature();
Serial.println("Temperature: "+(String)temperature);
Serial.println("Humidity: "+(String)humidity);
delay(1000);
WiFiClient client = server.available();
if (client) {
Serial.println("New client connected");
String response = "HTTP/1.1 200 OK\r\nContent-Type: text/html\r\n\r\n";
response += "<!DOCTYPE html><html><body>";
response += "<head><meta name=\"viewport\" content=\"width=device-width, initial-scale=1.0, user-scalable=no\">\n";
response += "<style>html { font-family: Helvetica; display: inline-block; margin: 0px auto; text-align: center;}\n";
response += "body{margin-top: 50px;} h1 {color: #444444;margin: 50px auto 30px;}\n";
response += "p {font-size: 24px;color: #444444;margin-bottom: 10px;}\n";
response += "</style>\n";
response += "</head>\n";
response += "<body>\n";
response += "<h1>Raspberry Pi Pico W Weather Station</h1>";
response += "<p>Temperature: <span id=\"temperature\"></span>" + String(temperature)+ "°C</p>";
response += "<p>Humidity: <span id=\"humidity\"></span> " + String(humidity) + " %</p>";
response += "</body></html>";
client.print(response);
delay(10);
client.stop();
Serial.println("Client disconnected");
}
}


